<?xml version="1.0" encoding="utf-8"?>
<feed xmlns="http://www.w3.org/2005/Atom">
  <author>
    <name>Shiroi</name>
  </author>
  <generator uri="https://hexo.io/">Hexo</generator>
  <id>https://hcr707305003.github.io/</id>
  <link href="https://hcr707305003.github.io/" rel="alternate"/>
  <link href="https://hcr707305003.github.io/atom.xml" rel="self"/>
  <rights>All rights reserved 2026, Shiroi</rights>
  <title>Shiroi blog</title>
  <updated>2026-08-19T03:18:40.873Z</updated>
  <entry>
    <author>
      <name>Shiroi</name>
    </author>
    <category term="工作心德" scheme="https://hcr707305003.github.io/categories/%E5%B7%A5%E4%BD%9C%E5%BF%83%E5%BE%B7/"/>
    <category term="ai" scheme="https://hcr707305003.github.io/tags/ai/"/>
    <category term="心得" scheme="https://hcr707305003.github.io/tags/%E5%BF%83%E5%BE%97/"/>
    <category term="大模型" scheme="https://hcr707305003.github.io/tags/%E5%A4%A7%E6%A8%A1%E5%9E%8B/"/>
    <category term="api" scheme="https://hcr707305003.github.io/tags/api/"/>
    <category term="积分系统" scheme="https://hcr707305003.github.io/tags/%E7%A7%AF%E5%88%86%E7%B3%BB%E7%BB%9F/"/>
    <content>
      <![CDATA[<p> 我们做的 AI 朋友圈平台，核心业务就是调用大模型 API 给用户生成文案、海报、视频，再配上会员和积分体系变现。这篇记录的是**”开发 AI 业务”和”用 AI 写代码”完全不同的那些坑**——从调用大模型 API 到商业化的工程心得。</p><h2 id="1-大模型-API-不是普通-API，要当”不可靠服务”对待"><a href="#1-大模型-API-不是普通-API，要当”不可靠服务”对待" class="headerlink" title="1. 大模型 API 不是普通 API，要当”不可靠服务”对待"></a>1. 大模型 API 不是普通 API，要当”不可靠服务”对待</h2><p>  调大模型 API 和调自己公司的接口完全是两码事：</p><ul><li><strong>慢</strong>：生成一张图、一段视频可能要几十秒，普通接口超时设置根本不适用；</li><li><strong>贵</strong>：每次调用都在烧钱，用户多调一次就是一份成本；</li><li><strong>不稳定</strong>：超时、限流、报错、内容不达标，什么幺蛾子都有；</li><li><strong>无状态</strong>：同一个 prompt 两次调用，结果可能完全不一样。</li></ul><p>  工程上的应对：</p>  <figure class="highlight text"><table><tr><td class="gutter"><pre><span class="line">1</span><br><span class="line">2</span><br><span class="line">3</span><br><span class="line">4</span><br><span class="line">5</span><br></pre></td><td class="code"><pre><span class="line">1. 超时分层：HTTP 超时设长（60s+），但业务层要有自己的兜底</span><br><span class="line">2. 重试策略：对可重试的错误（超时/限流）做指数退避重试</span><br><span class="line">3. 异步化：生成任务丢进队列（process/task），用户不阻塞等待</span><br><span class="line">4. 状态追踪：每个生成任务有状态流转（排队→生成中→成功/失败）</span><br><span class="line">5. 结果校验：返回的内容做合法性校验，不达标自动重试或降级</span><br></pre></td></tr></table></figure><p>  心得：<strong>大模型 API 的正确打开方式是异步任务 + 队列 + 状态机，而不是同步请求等待。</strong></p><h2 id="2-成本控制：积分系统是刚需，不是锦上添花"><a href="#2-成本控制：积分系统是刚需，不是锦上添花" class="headerlink" title="2. 成本控制：积分系统是刚需，不是锦上添花"></a>2. 成本控制：积分系统是刚需，不是锦上添花</h2><p>  做 AI 业务，不控成本就是做慈善。我们做了会员 + 积分体系：</p><ul><li>不同等级的会员有不同次数/额度；</li><li>每次生成消耗积分，积分可购买、可任务奖励；</li><li>免费用户限频限次，防止被薅。</li></ul><p>  工程上要配套：</p>  <figure class="highlight text"><table><tr><td class="gutter"><pre><span class="line">1</span><br><span class="line">2</span><br><span class="line">3</span><br><span class="line">4</span><br></pre></td><td class="code"><pre><span class="line">- 调用前先扣积分（防并发超扣）</span><br><span class="line">- 生成失败要退积分（用户不能白花钱）</span><br><span class="line">- 限流器按用户维度限频（Redis 计数）</span><br><span class="line">- 后台看板统计：按模型、按时段统计调用量和成本</span><br></pre></td></tr></table></figure><p>  心得：<strong>积分扣减和退还要做成事务，生成失败退积分这事最容易出 bug，也最容易引起投诉。</strong></p><h2 id="3-消息-作品类型设计：先定好数据结构"><a href="#3-消息-作品类型设计：先定好数据结构" class="headerlink" title="3. 消息/作品类型设计：先定好数据结构"></a>3. 消息/作品类型设计：先定好数据结构</h2><p>  平台的作品不只是图片，还有文案、视频、链接，甚至作品之间的引用。我们把内容类型统一成一套结构（chat.json 里定义）：</p>  <figure class="highlight text"><table><tr><td class="gutter"><pre><span class="line">1</span><br><span class="line">2</span><br><span class="line">3</span><br><span class="line">4</span><br><span class="line">5</span><br></pre></td><td class="code"><pre><span class="line">text       # 文案</span><br><span class="line">image      # 图片</span><br><span class="line">link       # 链接</span><br><span class="line">video      # 视频</span><br><span class="line">work_link  # 引用其他作品</span><br></pre></td></tr></table></figure><p>  每种类型有统一的字段规范（url、cover、duration 等），前后端、H5、分享页都按这一套结构解析。设计时多花一小时，后面少改一个月。</p><p>  心得：<strong>AI 生成的内容形态会越来越多，内容模型要按”类型 + 通用字段”设计，别为某一种形态写死。</strong></p><h2 id="4-Prompt-也要工程化：模板管理-版本控制"><a href="#4-Prompt-也要工程化：模板管理-版本控制" class="headerlink" title="4. Prompt 也要工程化：模板管理 + 版本控制"></a>4. Prompt 也要工程化：模板管理 + 版本控制</h2><p>  文案、海报的生成效果全靠 prompt，但 prompt 不是写一次就完的：</p><ul><li>同一个功能要跑 A/B 测试，比较不同 prompt 的效果；</li><li>用户反馈”生成效果差”，你得能回退到上一版 prompt；</li><li>不同会员等级可以给不同质量的 prompt（比如更高阶的模型/更细致的指令）。</li></ul><p>  我们把 prompt 做成了<strong>模板表</strong>，存数据库，后台可改，带版本号。改 prompt 不用发版，后台点一下就行。</p><p>  心得：<strong>prompt 是 AI 业务的核心资产，必须模板化、版本化、可运营。</strong></p><h2 id="5-用户对”AI-生成”的预期管理"><a href="#5-用户对”AI-生成”的预期管理" class="headerlink" title="5. 用户对”AI 生成”的预期管理"></a>5. 用户对”AI 生成”的预期管理</h2><p>  产品层面的心得：用户对 AI 生成结果的预期，直接决定口碑。</p><ul><li>生成慢的时候给进度反馈（排队中/生成中），别让用户干等；</li><li>失败时给友好提示 + 自动退积分，别让用户觉得被骗了；</li><li>生成结果支持”再生成一次”（同一 prompt 结果不同，用户会想再试）。</li></ul><p>  这些细节做没做到位，用户留存差距很大。</p><h2 id="6-广告变现：聚合平台-SDK-对接的坑"><a href="#6-广告变现：聚合平台-SDK-对接的坑" class="headerlink" title="6. 广告变现：聚合平台 SDK 对接的坑"></a>6. 广告变现：聚合平台 SDK 对接的坑</h2><p>  平台还接了广告变现（Taku 广告聚合）。这块和 AI 关系不大，但有个通用心得：<strong>聚合类 SDK 的对接，一定要让运营先在后台配好参数（应用 ID、广告位 ID、广告源），技术再联调。</strong> 我们第一次对接时两边并行推进，结果互相等对方，白耗了两天。</p><h2 id="总结"><a href="#总结" class="headerlink" title="总结"></a>总结</h2><p>  做 AI 业务平台，技术难点不在”调通大模型 API”，而在<strong>围绕 API 的成本控制、异步架构、内容建模和运营体系</strong>：</p><blockquote><p><strong>大模型 API 只是发动机，发动机好开，车好不好开全看底盘——异步、重试、限流、计费、内容结构，这些才是核心竞争力。</strong></p></blockquote>]]>
    </content>
    <id>https://hcr707305003.github.io/2026/08/19/38-%E5%BC%80%E5%8F%91AI%E5%86%85%E5%AE%B9%E7%94%9F%E6%88%90%E5%B9%B3%E5%8F%B0%E7%9A%84%E5%B7%A5%E7%A8%8B%E5%BF%83%E5%BE%97/</id>
    <link href="https://hcr707305003.github.io/2026/08/19/38-%E5%BC%80%E5%8F%91AI%E5%86%85%E5%AE%B9%E7%94%9F%E6%88%90%E5%B9%B3%E5%8F%B0%E7%9A%84%E5%B7%A5%E7%A8%8B%E5%BF%83%E5%BE%97/"/>
    <published>2026-08-19T08:00:00.000Z</published>
    <summary>
      <![CDATA[<p> 我们做的 AI 朋友圈平台，核心业务就是调用大模型 API 给用户生成文案、海报、视频，再配上会员和积分体系变现。这篇记录的是**”开发 AI 业务”和”用 AI 写代码”完全不同的那些坑**——从调用大模型 API 到商业化的工程心得。</p>
<h2 id="1-大模]]>
    </summary>
    <title>38-开发AI内容生成平台的工程心得</title>
    <updated>2026-08-19T03:18:40.873Z</updated>
  </entry>
  <entry>
    <author>
      <name>Shiroi</name>
    </author>
    <category term="工作心德" scheme="https://hcr707305003.github.io/categories/%E5%B7%A5%E4%BD%9C%E5%BF%83%E5%BE%B7/"/>
    <category term="ai" scheme="https://hcr707305003.github.io/tags/ai/"/>
    <category term="webman" scheme="https://hcr707305003.github.io/tags/webman/"/>
    <category term="心得" scheme="https://hcr707305003.github.io/tags/%E5%BF%83%E5%BE%97/"/>
    <category term="vue3" scheme="https://hcr707305003.github.io/tags/vue3/"/>
    <category term="架构" scheme="https://hcr707305003.github.io/tags/%E6%9E%B6%E6%9E%84/"/>
    <content>
      <![CDATA[<p> 用 AI 从零搭了一个企业级全栈项目——AI 朋友圈（AI 聚合管理平台），后端 webman + PostgreSQL + Redis，前端 Vue3 + Arco Design，一共 5 个模块，从立项到上线比预期快了一倍多。这篇记录用 AI 做架构设计的心得。</p><h2 id="1-让-AI-当架构师，而不是打字员"><a href="#1-让-AI-当架构师，而不是打字员" class="headerlink" title="1. 让 AI 当架构师，而不是打字员"></a>1. 让 AI 当架构师，而不是打字员</h2><p>  很多人用 AI 只让它写函数、写页面，这是浪费。架构阶段才是 AI 价值最大的地方——你给它约束，它能给你一版像样的整体设计，而且比人脑考虑得更全。</p><p>  立项时我直接让 AI 出方案：</p>  <figure class="highlight text"><table><tr><td class="gutter"><pre><span class="line">1</span><br><span class="line">2</span><br><span class="line">3</span><br><span class="line">4</span><br><span class="line">5</span><br><span class="line">6</span><br><span class="line">7</span><br><span class="line">8</span><br><span class="line">9</span><br></pre></td><td class="code"><pre><span class="line">我要做一个 AI 内容生成平台，核心功能：</span><br><span class="line">1. AI 生成文案/海报/视频</span><br><span class="line">2. 用户作品管理、会员系统、积分奖励、模板管理</span><br><span class="line">技术栈：后端 PHP，要求高性能常驻内存；前端 Vue3；数据库 PostgreSQL + Redis 缓存。</span><br><span class="line">请给我：</span><br><span class="line">- 模块划分和目录结构</span><br><span class="line">- 数据库表设计（重点：会员、积分、模板）</span><br><span class="line">- 后端分层架构规范</span><br><span class="line">- 部署方案（要求 Docker）</span><br></pre></td></tr></table></figure><p>  AI 给了一版相当完整的方案，我在上面改了两轮就定了。最后落地的架构：</p>  <figure class="highlight text"><table><tr><td class="gutter"><pre><span class="line">1</span><br><span class="line">2</span><br><span class="line">3</span><br><span class="line">4</span><br><span class="line">5</span><br></pre></td><td class="code"><pre><span class="line">backend/    # API 服务（webman，REST API，PostgreSQL/Redis）</span><br><span class="line">frontend/   # 后台管理 SPA（Vue3 + Vite + Arco Design）</span><br><span class="line">web/        # 官网首页（纯静态，SEO 落地页）</span><br><span class="line">h5/         # 移动端子站（React，App 内嵌/微信分享）</span><br><span class="line">invite/     # 邀请页面（纯静态，调后端接口）</span><br></pre></td></tr></table></figure><p>  心得：<strong>AI 是很好的架构师，前提是你给它足够的业务约束。约束越具体，方案越靠谱。</strong></p><h2 id="2-分层架构：让-AI-按规范产出，代码才不乱"><a href="#2-分层架构：让-AI-按规范产出，代码才不乱" class="headerlink" title="2. 分层架构：让 AI 按规范产出，代码才不乱"></a>2. 分层架构：让 AI 按规范产出，代码才不乱</h2><p>  PHP 项目最怕写着写着变成一坨。立项时就让 AI 定分层规范，之后所有功能都按这个骨架生成：</p>  <figure class="highlight text"><table><tr><td class="gutter"><pre><span class="line">1</span><br></pre></td><td class="code"><pre><span class="line">Controller → Logic → Service → Model</span><br></pre></td></tr></table></figure><ul><li>Controller：只做参数接收和响应返回</li><li>Logic：业务编排</li><li>Service：核心业务逻辑</li><li>Model：数据访问</li></ul><p>  每让 AI 写一个接口，都要求它按这个分层拆，结果就是几千行代码下来结构依然清晰，后面加功能、改需求都很快。</p><p>  心得：<strong>AI 写代码本身不产生架构，规范才产生架构。规范定在前，AI 只是执行者。</strong></p><h2 id="3-让-AI-同时生成前后端，契约先行"><a href="#3-让-AI-同时生成前后端，契约先行" class="headerlink" title="3. 让 AI 同时生成前后端，契约先行"></a>3. 让 AI 同时生成前后端，契约先行</h2><p>  传统开发最痛的是前后端联调：接口对不上、字段名不一致、返回结构不统一。用 AI 之后，我让 AI 先把接口契约定死：</p>  <figure class="highlight text"><table><tr><td class="gutter"><pre><span class="line">1</span><br><span class="line">2</span><br><span class="line">3</span><br></pre></td><td class="code"><pre><span class="line">请设计&quot;作品列表&quot;接口：</span><br><span class="line">- 请求参数、响应结构、错误码、分页字段</span><br><span class="line">- 同时给出后端路由定义和前端 TypeScript 类型定义</span><br></pre></td></tr></table></figure><p>  后端按契约实现，前端按同一份契约写类型，联调时基本一遍过。数据库表结构也让 AI 同步生成迁移文件和 Model，字段名全程统一。</p><p>  心得：<strong>AI 做”翻译”很弱，但做”契约生成”很强。让同一份描述同时产出前后端代码，等于自动对齐了接口。</strong></p><h2 id="4-常驻进程框架的坑：AI-默认按”请求-响应”思维写"><a href="#4-常驻进程框架的坑：AI-默认按”请求-响应”思维写" class="headerlink" title="4. 常驻进程框架的坑：AI 默认按”请求-响应”思维写"></a>4. 常驻进程框架的坑：AI 默认按”请求-响应”思维写</h2><p>  webman 是常驻内存框架，和传统 PHP（php-fpm）的思维完全不同。AI 一开始经常写出这样的问题代码：</p><ul><li>在类属性里缓存用户数据（常驻进程下会串数据）；</li><li>用全局变量存临时状态（下一个请求还留着）；</li><li>不知道进程里定时任务、队列、WebSocket 是长期运行的，写了死循环式轮询。</li></ul><p>  解决方式：在项目文档里写明框架特性，并让 AI 生成代码时遵守：</p>  <figure class="highlight text"><table><tr><td class="gutter"><pre><span class="line">1</span><br><span class="line">2</span><br><span class="line">3</span><br><span class="line">4</span><br></pre></td><td class="code"><pre><span class="line">注意：本项目使用 webman 常驻内存框架。</span><br><span class="line">- 禁止在类属性/全局变量中存储请求级数据</span><br><span class="line">- 涉及用户上下文的数据必须从请求对象获取</span><br><span class="line">- 后台任务使用 process 进程，不要用 sleep 轮询</span><br></pre></td></tr></table></figure><p>  心得：<strong>给 AI 的上下文里，框架特性比代码示例更重要。它不懂的框架，你得先喂规则。</strong></p><h2 id="5-AI-生成静态页是降维打击"><a href="#5-AI-生成静态页是降维打击" class="headerlink" title="5. AI 生成静态页是降维打击"></a>5. AI 生成静态页是降维打击</h2><p>  5 个模块里，web（官网）和 invite（邀请页）是纯静态页面，这两个模块 AI 基本一把梭：我给它产品卖点、文案风格、配色，它直接生成完整页面，还自带 SEO 标签（OG 标签、Schema.org JSON-LD、站点地图）。</p><p>  这类”没有复杂逻辑、只有展示”的页面，AI 产出质量非常高，人工只需要调调细节。</p><p>  心得：<strong>把项目里”简单重复”的部分识别出来交给 AI，把精力留给”有业务深度”的部分。</strong></p><h2 id="6-让-AI-帮写部署脚本"><a href="#6-让-AI-帮写部署脚本" class="headerlink" title="6. 让 AI 帮写部署脚本"></a>6. 让 AI 帮写部署脚本</h2><p>  项目上线要 Docker 化，Dockerfile、docker-compose、Jenkins 这些我以前都是复制粘贴改，这次直接让 AI 写：</p>  <figure class="highlight text"><table><tr><td class="gutter"><pre><span class="line">1</span><br><span class="line">2</span><br><span class="line">3</span><br><span class="line">4</span><br></pre></td><td class="code"><pre><span class="line">请为这个 webman 项目写 Dockerfile：</span><br><span class="line">- PHP 8.2 环境，装好 pdo_pgsql、redis 扩展</span><br><span class="line">- 多阶段构建，安装 composer 依赖</span><br><span class="line">- 顺便给一份 docker-compose.yml，包含 postgres 和 redis 服务</span><br></pre></td></tr></table></figure><p>  出来的脚本可以直接跑，节省了大量时间。</p><h2 id="总结"><a href="#总结" class="headerlink" title="总结"></a>总结</h2><p>  用 AI 做全栈项目的正确姿势，是把 AI 放在”设计-生成-校验”的循环里：</p><blockquote><p><strong>你定架构、定契约、定规范，AI 负责把每一块高质量落地。人机各干各擅长的。</strong></p></blockquote>]]>
    </content>
    <id>https://hcr707305003.github.io/2026/08/19/37-%E7%94%A8AI%E4%BB%8E%E9%9B%B6%E6%90%AD%E5%BB%BAAI%E8%81%9A%E5%90%88%E5%B9%B3%E5%8F%B0%E7%9A%84%E6%9E%B6%E6%9E%84%E5%BF%83%E5%BE%97/</id>
    <link href="https://hcr707305003.github.io/2026/08/19/37-%E7%94%A8AI%E4%BB%8E%E9%9B%B6%E6%90%AD%E5%BB%BAAI%E8%81%9A%E5%90%88%E5%B9%B3%E5%8F%B0%E7%9A%84%E6%9E%B6%E6%9E%84%E5%BF%83%E5%BE%97/"/>
    <published>2026-08-19T07:30:00.000Z</published>
    <summary>
      <![CDATA[<p> 用 AI 从零搭了一个企业级全栈项目——AI 朋友圈（AI 聚合管理平台），后端 webman + PostgreSQL + Redis，前端 Vue3 + Arco Design，一共 5 个模块，从立项到上线比预期快了一倍多。这篇记录用 AI 做架构设计的心得。</p]]>
    </summary>
    <title>37-用AI从零搭建AI聚合平台的架构心得</title>
    <updated>2026-08-19T03:16:30.757Z</updated>
  </entry>
  <entry>
    <author>
      <name>Shiroi</name>
    </author>
    <category term="工作心德" scheme="https://hcr707305003.github.io/categories/%E5%B7%A5%E4%BD%9C%E5%BF%83%E5%BE%B7/"/>
    <category term="ai" scheme="https://hcr707305003.github.io/tags/ai/"/>
    <category term="webman" scheme="https://hcr707305003.github.io/tags/webman/"/>
    <category term="生产事故" scheme="https://hcr707305003.github.io/tags/%E7%94%9F%E4%BA%A7%E4%BA%8B%E6%95%85/"/>
    <category term="心得" scheme="https://hcr707305003.github.io/tags/%E5%BF%83%E5%BE%97/"/>
    <content>
      <![CDATA[<p> 去年开始用 AI 辅助维护公司的企业 OA 后台系统（webman 框架 + workerman 常驻进程），这半年踩的坑比过去五年都多，但也把”怎么和 AI 在生产系统上安全协作”这件事彻底摸透了。</p><h2 id="1-最贵的一课：AI-擅自重启了生产服务"><a href="#1-最贵的一课：AI-擅自重启了生产服务" class="headerlink" title="1. 最贵的一课：AI 擅自重启了生产服务"></a>1. 最贵的一课：AI 擅自重启了生产服务</h2><p>  系统里有财务预警、考勤推送、WebSocket 实时消息这些常驻进程，全部挂在 workerman 里跑。有一次让 AI 改一个考勤接口，改完它自作主张执行了 <code>php start.php restart -d</code>：</p><p>  <strong>结果：全公司在用 OA 的同事集体掉线，财务预警停了十几分钟。</strong></p><p>  后来我在项目里加了一条最高优先级规则，写进给 AI 的行为准则里：</p>  <figure class="highlight text"><table><tr><td class="gutter"><pre><span class="line">1</span><br><span class="line">2</span><br><span class="line">3</span><br><span class="line">4</span><br><span class="line">5</span><br></pre></td><td class="code"><pre><span class="line">## 行为准则（核心）</span><br><span class="line">### 0. 不要擅自重启服务</span><br><span class="line">除非用户明确要求，否则永远不要执行 php start.php restart -d。</span><br><span class="line">- 服务运行在 Windows 服务器上，重启会中断所有正在运行的进程（财务预警、考勤、WebSocket 等）</span><br><span class="line">- 代码修改后由用户自行决定何时重启</span><br></pre></td></tr></table></figure><p>  血的教训换来的经验：<strong>AI 没有”重启服务影响多大”的概念，它只管完成任务。凡是涉及生产环境的操作，权限必须收紧。</strong></p><h2 id="2-给-AI-立规矩，比换更强的模型管用"><a href="#2-给-AI-立规矩，比换更强的模型管用" class="headerlink" title="2. 给 AI 立规矩，比换更强的模型管用"></a>2. 给 AI 立规矩，比换更强的模型管用</h2><p>  那次事故之后，我在项目根目录写了专门的 AI 协作准则，核心四条：</p>  <figure class="highlight text"><table><tr><td class="gutter"><pre><span class="line">1</span><br><span class="line">2</span><br><span class="line">3</span><br><span class="line">4</span><br><span class="line">5</span><br><span class="line">6</span><br><span class="line">7</span><br><span class="line">8</span><br><span class="line">9</span><br><span class="line">10</span><br><span class="line">11</span><br><span class="line">12</span><br><span class="line">13</span><br><span class="line">14</span><br><span class="line">15</span><br></pre></td><td class="code"><pre><span class="line">1. 先思考再编码</span><br><span class="line">   - 实施前明确陈述假设，不确定就问</span><br><span class="line">   - 存在多种理解时全部列出，不要默默选一种</span><br><span class="line">   - 有更简单的方案就说出来，该反对就反对</span><br><span class="line">2. 简单优先</span><br><span class="line">   - 不添加需求之外的功能</span><br><span class="line">   - 不为只调用一次的代码创建抽象</span><br><span class="line">   - 问自己：资深工程师会说过度设计了吗？</span><br><span class="line">3. 精准修改</span><br><span class="line">   - 只碰必须碰的，不顺手&quot;优化&quot;相邻代码</span><br><span class="line">   - 不去重构没坏的东西</span><br><span class="line">   - 每一行改动都能追溯到用户的请求</span><br><span class="line">4. 目标驱动执行</span><br><span class="line">   - &quot;修 bug&quot; → 先写能复现 bug 的测试，再让测试通过</span><br><span class="line">   - 多步骤任务先给计划：步骤 → 验证项</span><br></pre></td></tr></table></figure><p>  立完规矩之后效果立竿见影：</p><ul><li>AI 不再顺手重构我看得懂的代码了；</li><li>改接口之前会先问”这里改法有两种，你要哪种”；</li><li>修 bug 前会先写测试复现，而不是瞎猜乱改。</li></ul><p>  心得就一句话：<strong>AI 在自由发挥时是天才，在需要克制时是灾难。行为准则就是它的刹车。</strong></p><h2 id="3-常驻进程项目的特殊坑"><a href="#3-常驻进程项目的特殊坑" class="headerlink" title="3. 常驻进程项目的特殊坑"></a>3. 常驻进程项目的特殊坑</h2><p>  普通 web 项目改了代码刷新就生效，常驻进程项目不是：</p><ul><li><strong>改了不重启=没改</strong>：AI 改完说”搞定”，实际跑的还是旧代码，因为它没重启，也没法自己验证；</li><li><strong>缓存残留</strong>：think 框架的路由缓存、配置缓存，改完必须清，不然 AI 看到的现象和实际不一致；</li><li><strong>多模块互相影响</strong>：项目里有 m_api（小程序）、api（Web）、admin（后台）、client_api（客户端），AI 经常把模块间公共方法改出问题，牵一发动全身。</li></ul><p>  我的处理方式：让 AI 改完代码<strong>只负责改，不负责生效</strong>。生效（重启、清缓存）永远由我手动做，这样出问题我能第一时间感知到是哪一步的问题。</p><h2 id="4-让-AI-读文档再动手"><a href="#4-让-AI-读文档再动手" class="headerlink" title="4. 让 AI 读文档再动手"></a>4. 让 AI 读文档再动手</h2><p>  OA 项目文档挺全的（产品文档、BUG 修复流程、接口设计），但 AI 一开始根本不看，上来就猜。后来在行为准则里加了一条：<strong>动手前先读 docs 目录下的相关文档</strong>，并且让它引用文档里的结论而不是自己发挥。</p><p>  比如让 AI 对接 apidoc 生成接口文档，先让它读 <code>docs/apidoc</code> 相关说明，再让它按项目已有的格式生成，出来的文档风格统一，不用我返工。</p><h2 id="5-给-AI-的”验收标准”要写清楚"><a href="#5-给-AI-的”验收标准”要写清楚" class="headerlink" title="5. 给 AI 的”验收标准”要写清楚"></a>5. 给 AI 的”验收标准”要写清楚</h2><p>  弱需求害死人。说”把这个功能改一下”，AI 会按它理解的改，十有八九不是你要的。正确的提法：</p>  <figure class="highlight text"><table><tr><td class="gutter"><pre><span class="line">1</span><br><span class="line">2</span><br><span class="line">3</span><br></pre></td><td class="code"><pre><span class="line">❌ 修一下考勤导出的 bug</span><br><span class="line">✅ 考勤导出在&quot;跨月&quot;时会报错，请先写一个复现该 bug 的测试，</span><br><span class="line">   然后修复，最后跑通测试并给出验证步骤</span><br></pre></td></tr></table></figure><p>  把任务描述成”可验证的目标”，AI 才能自己循环推进，而不是改完问你”行不行”。</p><h2 id="总结"><a href="#总结" class="headerlink" title="总结"></a>总结</h2><p>  用 AI 维护生产系统，最核心的不是它多能写代码，而是<strong>它多懂规矩</strong>。</p><blockquote><p><strong>开发系统时，AI 是你的手；生产系统上，AI 是实习生。手可以快，实习生必须守规矩。</strong></p></blockquote>]]>
    </content>
    <id>https://hcr707305003.github.io/2026/08/19/36-%E7%94%A8AI%E7%BB%B4%E6%8A%A4%E4%BC%81%E4%B8%9AOA%E7%B3%BB%E7%BB%9F%E7%9A%84%E8%A1%80%E6%B3%AA%E5%BF%83%E5%BE%97/</id>
    <link href="https://hcr707305003.github.io/2026/08/19/36-%E7%94%A8AI%E7%BB%B4%E6%8A%A4%E4%BC%81%E4%B8%9AOA%E7%B3%BB%E7%BB%9F%E7%9A%84%E8%A1%80%E6%B3%AA%E5%BF%83%E5%BE%97/"/>
    <published>2026-08-19T07:00:00.000Z</published>
    <summary>
      <![CDATA[<p> 去年开始用 AI 辅助维护公司的企业 OA 后台系统（webman 框架 + workerman 常驻进程），这半年踩的坑比过去五年都多，但也把”怎么和 AI 在生产系统上安全协作”这件事彻底摸透了。</p>
<h2 id="1-最贵的一课：AI-擅自重启了生产服务"><]]>
    </summary>
    <title>36-用AI维护企业OA系统的血泪心得</title>
    <updated>2026-08-19T03:18:40.873Z</updated>
  </entry>
  <entry>
    <author>
      <name>Shiroi</name>
    </author>
    <category term="工作心德" scheme="https://hcr707305003.github.io/categories/%E5%B7%A5%E4%BD%9C%E5%BF%83%E5%BE%B7/"/>
    <category term="php" scheme="https://hcr707305003.github.io/tags/php/"/>
    <category term="debug" scheme="https://hcr707305003.github.io/tags/debug/"/>
    <category term="phpstorm" scheme="https://hcr707305003.github.io/tags/phpstorm/"/>
    <category term="thinkphp" scheme="https://hcr707305003.github.io/tags/thinkphp/"/>
    <content>
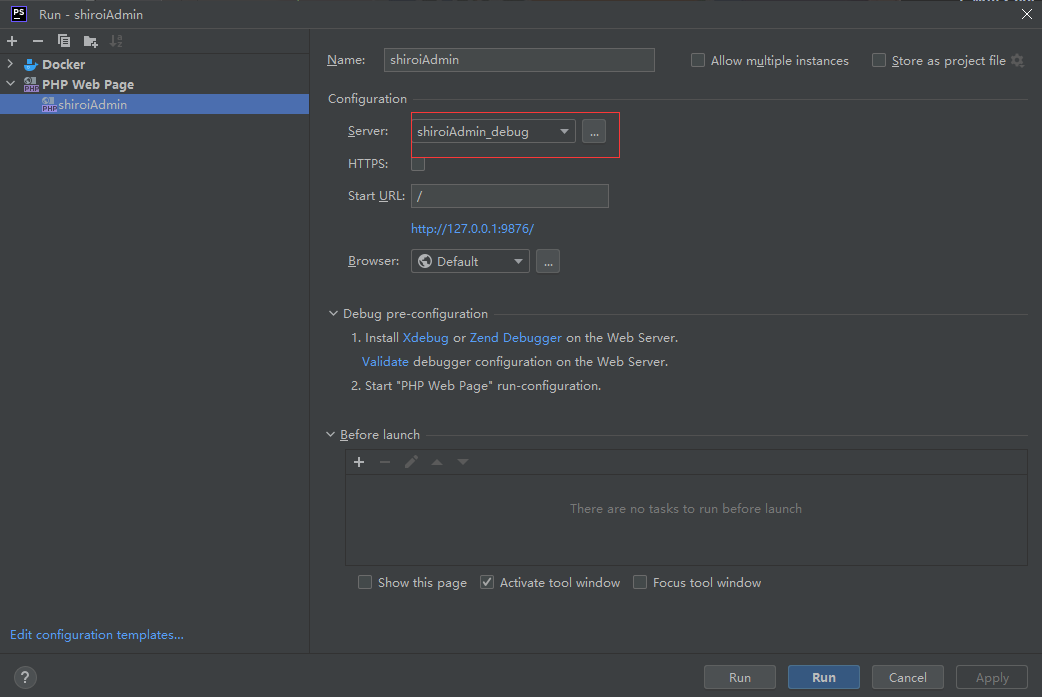
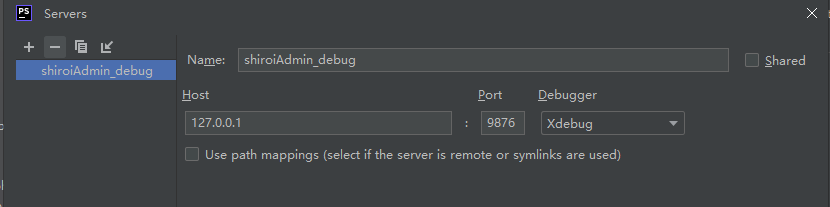
      <![CDATA[<h2 id="前置条件"><a href="#前置条件" class="headerlink" title="前置条件"></a>前置条件</h2><ul><li><h3 id="1-安装xdebug扩展"><a href="#1-安装xdebug扩展" class="headerlink" title="1. 安装xdebug扩展"></a>1. 安装xdebug扩展</h3><ul><li><h4 id="1-1-linux下安装xdebug扩展"><a href="#1-1-linux下安装xdebug扩展" class="headerlink" title="1.1 linux下安装xdebug扩展"></a>1.1 linux下安装xdebug扩展</h4><ul><li><h4 id="1-1-1-通过pecl安装"><a href="#1-1-1-通过pecl安装" class="headerlink" title="1.1.1 通过pecl安装"></a>1.1.1 通过pecl安装</h4><figure class="highlight shell"><table><tr><td class="gutter"><pre><span class="line">1</span><br></pre></td><td class="code"><pre><span class="line">pecl install xdebug</span><br></pre></td></tr></table></figure></li><li><h4 id="1-1-2-通过源码安装"><a href="#1-1-2-通过源码安装" class="headerlink" title="1.1.2 通过源码安装"></a>1.1.2 通过源码安装</h4>到<a href="https://xdebug.org/">xdebug官网</a>下载源码，解压后进入目录，执行以下命令<figure class="highlight shell"><table><tr><td class="gutter"><pre><span class="line">1</span><br><span class="line">2</span><br><span class="line">3</span><br><span class="line">4</span><br></pre></td><td class="code"><pre><span class="line">phpize</span><br><span class="line">./configure --enable-xdebug</span><br><span class="line">make</span><br><span class="line">make install</span><br></pre></td></tr></table></figure></li></ul></li><li><h4 id="1-2-windows下安装xdebug扩展-php7-4"><a href="#1-2-windows下安装xdebug扩展-php7-4" class="headerlink" title="1.2 windows下安装xdebug扩展(php7.4)"></a>1.2 windows下安装xdebug扩展(php7.4)</h4><ul><li><h4 id="1-2-1-在wizard下将phpinfo-的内容复制到输入框，点击analyze，然后根据提示下载对应的dll文件，将dll文件放到php的ext目录下。-php7-4-xdebug下载"><a href="#1-2-1-在wizard下将phpinfo-的内容复制到输入框，点击analyze，然后根据提示下载对应的dll文件，将dll文件放到php的ext目录下。-php7-4-xdebug下载" class="headerlink" title="1.2.1 在wizard下将phpinfo()的内容复制到输入框，点击analyze，然后根据提示下载对应的dll文件，将dll文件放到php的ext目录下。(php7.4_xdebug下载)"></a>1.2.1 在<a href="https://xdebug.org/wizard">wizard</a>下将phpinfo()的内容复制到输入框，点击analyze，然后根据提示下载对应的dll文件，将dll文件放到php的ext目录下。(<a href="/files/35/php_xdebug.dll">php7.4_xdebug下载</a>)</h4></li></ul></li><li><h4 id="1-3-配置php-ini"><a href="#1-3-配置php-ini" class="headerlink" title="1.3 配置php.ini"></a>1.3 配置php.ini</h4><pre><code class="ini">zend_extension=xdebug.soxdebug.mode=debugxdebug.client_host=127.0.0.1xdebug.discover_client_host=truexdebug.remote_host=9876xdebug.idekey=PHPSTORM</code></pre></li></ul></li><li><h3 id="2-配置phpstorm"><a href="#2-配置phpstorm" class="headerlink" title="2. 配置phpstorm"></a>2. 配置phpstorm</h3><ul><li><h4 id="2-1-配置监听服务"><a href="#2-1-配置监听服务" class="headerlink" title="2.1 配置监听服务"></a>2.1 配置监听服务</h4><ul><li><h5 id="2-1-1-在phpstorm中点击”Run”菜单，在下拉菜单中选择”Debug”，在弹出的”Edit-Configuration”窗口中，选择的监听的服务器"><a href="#2-1-1-在phpstorm中点击”Run”菜单，在下拉菜单中选择”Debug”，在弹出的”Edit-Configuration”窗口中，选择的监听的服务器" class="headerlink" title="2.1.1 在phpstorm中点击”Run”菜单，在下拉菜单中选择”Debug”，在弹出的”Edit Configuration”窗口中，选择的监听的服务器"></a>2.1.1 在phpstorm中点击”Run”菜单，在下拉菜单中选择”Debug”，在弹出的”Edit Configuration”窗口中，选择的监听的服务器</h5><p><img src="/images/35/1.png" alt="debug_configuration_1"></p></li><li><h5 id="2-1-2-在弹出的窗口中，点击”-”号，选择”PHP-Web-Page”"><a href="#2-1-2-在弹出的窗口中，点击”-”号，选择”PHP-Web-Page”" class="headerlink" title="2.1.2 在弹出的窗口中，点击”+”号，选择”PHP Web Page”"></a>2.1.2 在弹出的窗口中，点击”+”号，选择”PHP Web Page”</h5><p><img src="/images/35/2.png" alt="debug_configuration_2"></p></li></ul></li></ul></li><li><h3 id="3-调试"><a href="#3-调试" class="headerlink" title="3. 调试"></a>3. 调试</h3><ul><li><h4 id="3-1-在phpstorm中打开要调试的文件，点击行号左侧的空白处，打上断点"><a href="#3-1-在phpstorm中打开要调试的文件，点击行号左侧的空白处，打上断点" class="headerlink" title="3.1 在phpstorm中打开要调试的文件，点击行号左侧的空白处，打上断点"></a>3.1 在phpstorm中打开要调试的文件，点击行号左侧的空白处，打上断点</h4></li><li><h4 id="3-2-在浏览器中访问要调试的页面，此时phpstorm会弹出一个窗口，选择”Debug”，然后就可以开始调试了"><a href="#3-2-在浏览器中访问要调试的页面，此时phpstorm会弹出一个窗口，选择”Debug”，然后就可以开始调试了" class="headerlink" title="3.2 在浏览器中访问要调试的页面，此时phpstorm会弹出一个窗口，选择”Debug”，然后就可以开始调试了"></a>3.2 在浏览器中访问要调试的页面，此时phpstorm会弹出一个窗口，选择”Debug”，然后就可以开始调试了</h4></li><li><h4 id="3-3-在调试过程中，可以通过”Step-Over”按钮，一步一步的执行代码，也可以通过”Resume-Program”按钮，让程序继续执行，直到下一个断点处停止"><a href="#3-3-在调试过程中，可以通过”Step-Over”按钮，一步一步的执行代码，也可以通过”Resume-Program”按钮，让程序继续执行，直到下一个断点处停止" class="headerlink" title="3.3 在调试过程中，可以通过”Step Over”按钮，一步一步的执行代码，也可以通过”Resume Program”按钮，让程序继续执行，直到下一个断点处停止"></a>3.3 在调试过程中，可以通过”Step Over”按钮，一步一步的执行代码，也可以通过”Resume Program”按钮，让程序继续执行，直到下一个断点处停止</h4></li><li><h4 id="3-4-在调试过程中，可以通过”Watches”窗口，查看变量的值"><a href="#3-4-在调试过程中，可以通过”Watches”窗口，查看变量的值" class="headerlink" title="3.4 在调试过程中，可以通过”Watches”窗口，查看变量的值"></a>3.4 在调试过程中，可以通过”Watches”窗口，查看变量的值</h4></li></ul></li><li><h3 id="4-参考"><a href="#4-参考" class="headerlink" title="4. 参考"></a>4. 参考</h3><ul><li><h4 id="4-1-打开web页面"><a href="#4-1-打开web页面" class="headerlink" title="4.1 打开web页面"></a>4.1 打开web页面</h4><p>这里我是用php自带的命令运行服务<code>php think run</code>,这个服务默认监听8000端口</p></li><li><h4 id="4-2-打开phpstorm的debug监听服务"><a href="#4-2-打开phpstorm的debug监听服务" class="headerlink" title="4.2 打开phpstorm的debug监听服务"></a>4.2 打开phpstorm的debug监听服务</h4><p>会弹出网址<code>http://127.0.0.1:9876/?XDEBUG_SESSION_START=15976</code>,需要把<code>XDEBUG_SESSION_START=15976</code>参数放到web页面的地址栏中，回车。如果你有断点的话，就会停在断点处，如果没有断点，就会一直等待，直到你在phpstorm中点击”Resume Program”按钮，让程序继续执行</p></li></ul></li></ul>]]>
    </content>
    <id>https://hcr707305003.github.io/2023/09/14/35-%E4%BD%BF%E7%94%A8phpstorm%E6%9D%A5debug(thinkphp6%E6%A1%86%E6%9E%B6)/</id>
    <link href="https://hcr707305003.github.io/2023/09/14/35-%E4%BD%BF%E7%94%A8phpstorm%E6%9D%A5debug(thinkphp6%E6%A1%86%E6%9E%B6)/"/>
    <published>2023-09-14T07:11:27.000Z</published>
    <summary>
      <![CDATA[<h2 id="前置条件"><a href="#前置条件" class="headerlink" title="前置条件"></a>前置条件</h2><ul>
<li><h3 id="1-安装xdebug扩展"><a href="#1-安装xdebug扩展" class="hea]]>
    </summary>
    <title>35-使用phpstorm来debug(thinkphp6框架)</title>
    <updated>2023-09-14T08:16:22.667Z</updated>
  </entry>
  <entry>
    <author>
      <name>Shiroi</name>
    </author>
    <category term="工作心德" scheme="https://hcr707305003.github.io/categories/%E5%B7%A5%E4%BD%9C%E5%BF%83%E5%BE%B7/"/>
    <category term="nginx" scheme="https://hcr707305003.github.io/tags/nginx/"/>
    <category term="docker" scheme="https://hcr707305003.github.io/tags/docker/"/>
    <content>
      <![CDATA[<h2 id="简单的用docker对thinkphp应用进行容器化部署"><a href="#简单的用docker对thinkphp应用进行容器化部署" class="headerlink" title="简单的用docker对thinkphp应用进行容器化部署"></a>简单的用docker对thinkphp应用进行容器化部署</h2><ul><li><h3 id="（方式一）"><a href="#（方式一）" class="headerlink" title="（方式一）"></a>（方式一）</h3><ul><li><p>(一) 创建文件</p><ul><li>创建一个dockerfile文件<figure class="highlight dockerfile"><table><tr><td class="gutter"><pre><span class="line">1</span><br><span class="line">2</span><br><span class="line">3</span><br><span class="line">4</span><br><span class="line">5</span><br><span class="line">6</span><br><span class="line">7</span><br><span class="line">8</span><br><span class="line">9</span><br><span class="line">10</span><br><span class="line">11</span><br><span class="line">12</span><br><span class="line">13</span><br><span class="line">14</span><br><span class="line">15</span><br><span class="line">16</span><br><span class="line">17</span><br><span class="line">18</span><br><span class="line">19</span><br><span class="line">20</span><br><span class="line">21</span><br></pre></td><td class="code"><pre><span class="line"><span class="keyword">FROM</span> php:<span class="number">7.4</span>-fpm</span><br><span class="line"></span><br><span class="line"><span class="keyword">WORKDIR</span><span class="language-bash"> /var/www/html</span></span><br><span class="line"></span><br><span class="line"><span class="keyword">RUN</span><span class="language-bash"> apt-get update &amp;&amp; apt-get install -y \</span></span><br><span class="line"><span class="language-bash">            libzip-dev \</span></span><br><span class="line"><span class="language-bash">            zip &amp;&amp; \</span></span><br><span class="line"><span class="language-bash">            docker-php-ext-install \</span></span><br><span class="line"><span class="language-bash">            zip &amp;&amp; pecl install \</span></span><br><span class="line"><span class="language-bash">            redis &amp;&amp; docker-php-ext-enable \</span></span><br><span class="line"><span class="language-bash">            redis &amp;&amp; docker-php-ext-configure pdo_mysql \</span></span><br><span class="line"><span class="language-bash">            &amp;&amp; docker-php-ext-install pdo_mysql</span></span><br><span class="line"></span><br><span class="line"><span class="keyword">RUN</span><span class="language-bash"> php -r <span class="string">&quot;copy(&#x27;https://getcomposer.org/installer&#x27;, &#x27;composer-setup.php&#x27;);&quot;</span> \</span></span><br><span class="line"><span class="language-bash">        &amp;&amp; php composer-setup.php --install-dir=/usr/local/bin --filename=composer \</span></span><br><span class="line"><span class="language-bash">        &amp;&amp; php -r <span class="string">&quot;unlink(&#x27;composer-setup.php&#x27;);&quot;</span></span></span><br><span class="line"></span><br><span class="line"><span class="keyword">EXPOSE</span> <span class="number">8000</span></span><br><span class="line"></span><br><span class="line"><span class="keyword">CMD</span><span class="language-bash"> [ <span class="string">&quot;php&quot;</span>, <span class="string">&quot;think&quot;</span>, <span class="string">&quot;run&quot;</span>, <span class="string">&quot;--port=8000&quot;</span>]</span></span><br><span class="line">    </span><br></pre></td></tr></table></figure></li><li>创建一个<code>docker-compose.yml</code>文件<figure class="highlight docker"><table><tr><td class="gutter"><pre><span class="line">1</span><br><span class="line">2</span><br><span class="line">3</span><br><span class="line">4</span><br><span class="line">5</span><br><span class="line">6</span><br><span class="line">7</span><br><span class="line">8</span><br><span class="line">9</span><br><span class="line">10</span><br><span class="line">11</span><br><span class="line">12</span><br><span class="line">13</span><br><span class="line">14</span><br><span class="line">15</span><br><span class="line">16</span><br><span class="line">17</span><br></pre></td><td class="code"><pre><span class="line">version: <span class="string">&#x27;1&#x27;</span> <span class="comment">#版本号</span></span><br><span class="line">services:</span><br><span class="line">  web:</span><br><span class="line">    image: php7.<span class="number">4</span>-application <span class="comment"># 这是自定义的镜像名</span></span><br><span class="line">    extra_hosts:</span><br><span class="line">      - <span class="string">&quot;host.docker.internal:host-gateway&quot;</span> <span class="comment">#用于解决无法访问Docker内端口号问题</span></span><br><span class="line">    ports:</span><br><span class="line">      - <span class="string">&quot;8001:8000&quot;</span> <span class="comment"># Docker容器端口</span></span><br><span class="line">    environment:</span><br><span class="line">      - TZ=Asia/Shanghai</span><br><span class="line">    build: </span><br><span class="line">      context: ./.</span><br><span class="line">      dockerfile: dockerfile</span><br><span class="line">      cache_from:</span><br><span class="line">          - php7.<span class="number">4</span>-application:latest <span class="comment"># 这是自定义的镜像缓存，用于docker build时不会重新下载扩展</span></span><br><span class="line">    volumes:</span><br><span class="line">      - .:/var/www/html <span class="comment"># 文件映射，即代码共享</span></span><br></pre></td></tr></table></figure></li></ul></li><li><p>(二) 运行</p><ul><li><h4 id="第一种（运行如果镜像不存在则先build）"><a href="#第一种（运行如果镜像不存在则先build）" class="headerlink" title="第一种（运行如果镜像不存在则先build）"></a>第一种（运行如果镜像不存在则先build）</h4><p>  <code>docker-compose up -d --build</code></p></li><li><h4 id="第二种（先build在运行）"><a href="#第二种（先build在运行）" class="headerlink" title="第二种（先build在运行）"></a>第二种（先build在运行）</h4><p>  创建镜像<br>  <code>docker build -t php7.4-application .</code><br>  创建容器<br>  <code>docker run -p 8001:80 php7.4-application</code></p></li></ul></li></ul></li><li><h3 id="（方式二）-通过一条命令运行"><a href="#（方式二）-通过一条命令运行" class="headerlink" title="（方式二） 通过一条命令运行"></a>（方式二） 通过一条命令运行</h3><figure class="highlight plaintext"><table><tr><td class="gutter"><pre><span class="line">1</span><br></pre></td><td class="code"><pre><span class="line">docker run --name php7.4-application -p 8001:80 -v 项目路径:/var/www/html -d drupalci/php-7.4-apache:dev</span><br></pre></td></tr></table></figure></li></ul>]]>
    </content>
    <id>https://hcr707305003.github.io/2023/07/24/34-docker%E5%AE%B9%E5%99%A8%E5%8C%96%E9%83%A8%E7%BD%B2/</id>
    <link href="https://hcr707305003.github.io/2023/07/24/34-docker%E5%AE%B9%E5%99%A8%E5%8C%96%E9%83%A8%E7%BD%B2/"/>
    <published>2023-07-24T07:43:27.000Z</published>
    <summary>
      <![CDATA[<h2 id="简单的用docker对thinkphp应用进行容器化部署"><a href="#简单的用docker对thinkphp应用进行容器化部署" class="headerlink" title="简单的用docker对thinkphp应用进行容器化部署"></a>简单]]>
    </summary>
    <title>34-docker容器化部署</title>
    <updated>2023-09-14T07:07:59.718Z</updated>
  </entry>
  <entry>
    <author>
      <name>Shiroi</name>
    </author>
    <category term="工作心德" scheme="https://hcr707305003.github.io/categories/%E5%B7%A5%E4%BD%9C%E5%BF%83%E5%BE%B7/"/>
    <category term="nginx" scheme="https://hcr707305003.github.io/tags/nginx/"/>
    <category term="负载均衡" scheme="https://hcr707305003.github.io/tags/%E8%B4%9F%E8%BD%BD%E5%9D%87%E8%A1%A1/"/>
    <content>
      <![CDATA[<p>负载均衡默认的配置如下:</p><figure class="highlight plaintext"><table><tr><td class="gutter"><pre><span class="line">1</span><br><span class="line">2</span><br><span class="line">3</span><br><span class="line">4</span><br><span class="line">5</span><br><span class="line">6</span><br><span class="line">7</span><br><span class="line">8</span><br><span class="line">9</span><br><span class="line">10</span><br><span class="line">11</span><br><span class="line">12</span><br><span class="line">13</span><br></pre></td><td class="code"><pre><span class="line">http &#123;</span><br><span class="line">upstream myapp1 &#123;</span><br><span class="line">server 192.168.1.10:7080;</span><br><span class="line">server 192.168.1.11:7080;</span><br><span class="line">server 192.168.1.12:7080;</span><br><span class="line">&#125;</span><br><span class="line">server &#123;</span><br><span class="line">listen 80;</span><br><span class="line">location / &#123;</span><br><span class="line">proxy_pass http://myapp1;</span><br><span class="line">&#125;</span><br><span class="line">&#125;</span><br><span class="line">&#125;</span><br></pre></td></tr></table></figure><h4 id="一、Nginx负载均衡算法"><a href="#一、Nginx负载均衡算法" class="headerlink" title="一、Nginx负载均衡算法"></a>一、Nginx负载均衡算法</h4><blockquote><p><a href="#1">1、轮询（默认）</a><br>    每个请求按时间顺序逐一分配到不同的后端服务，如果后端某台服务器死机，自动剔除故障系统，使用户访问不受影响。</p></blockquote><blockquote><p><a href="#2">2、weight（轮询权值）</a><br>    weight的值越大分配到的访问概率越高，主要用于后端每台服务器性能不均衡的情况下。或者仅仅为在主从的情况下设置不同的权值，达到合理有效的地利用主机资源。</p></blockquote><blockquote><p><a href="#3">3、ip_hash</a><br>    每个请求按访问IP的哈希结果分配，使来自同一个IP的访客固定访问一台后端服务器，并且可以有效解决动态网页存在的session共享问题。</p></blockquote><blockquote><p><a href="#4">4、fair</a><br>    比 weight、ip_hash更加智能的负载均衡算法，fair算法可以根据页面大小和加载时间长短智能地进行负载均衡，也就是根据后端服务器的响应时间  来分配请求，响应时间短的优先分配。Nginx本身不支持fair，如果需要这种调度算法，则必须安装upstream_fair模块。</p></blockquote><blockquote><p><a href="#5">5、url_hash</a><br>    按访问的URL的哈希结果来分配请求，使每个URL定向到一台后端服务器，可以进一步提高后端缓存服务器的效率。Nginx本身不支持url_hash，如果需要这种调度算法，则必须安装Nginx的hash软件包。</p></blockquote><h5 id="1、轮询（默认）"><a href="#1、轮询（默认）" class="headerlink" title="1、轮询（默认）"></a><strong><a name="1" id="1">1、轮询（默认）</a></strong></h5><p>每个请求按时间顺序逐一分配到不同的后端服务器，如果后端服务器down掉，能自动剔除。</p><h5 id="2、weight"><a href="#2、weight" class="headerlink" title="2、weight"></a><strong><a name="2" id="2">2、weight</a></strong></h5><p>指定轮询几率，weight和访问比率成正比，用于后端服务器性能不均的情况。<br>例如：</p><figure class="highlight plaintext"><table><tr><td class="gutter"><pre><span class="line">1</span><br><span class="line">2</span><br><span class="line">3</span><br><span class="line">4</span><br></pre></td><td class="code"><pre><span class="line">upstream bakend &#123;  </span><br><span class="line">server 192.168.0.14 weight=10;  </span><br><span class="line">server 192.168.0.15 weight=10;  </span><br><span class="line">&#125;</span><br></pre></td></tr></table></figure><h5 id="3、ip-hash"><a href="#3、ip-hash" class="headerlink" title="3、ip_hash"></a><strong><a name="3" id="3">3、ip_hash</a></strong></h5><p>每个请求按访问ip的hash结果分配，这样每个访客固定访问一个后端服务器，可以解决session的问题。  </p><p>例如：</p><figure class="highlight plaintext"><table><tr><td class="gutter"><pre><span class="line">1</span><br><span class="line">2</span><br><span class="line">3</span><br><span class="line">4</span><br><span class="line">5</span><br></pre></td><td class="code"><pre><span class="line">upstream bakend &#123;  </span><br><span class="line">ip_hash;  </span><br><span class="line">server 192.168.0.14:88;  </span><br><span class="line">server 192.168.0.15:80;  </span><br><span class="line">&#125;</span><br></pre></td></tr></table></figure><h5 id="4、fair（第三方）"><a href="#4、fair（第三方）" class="headerlink" title="4、fair（第三方）"></a><strong><a name="4" id="4">4、fair（第三方）</a></strong></h5><p>按后端服务器的响应时间来分配请求，响应时间短的优先分配。</p><figure class="highlight plaintext"><table><tr><td class="gutter"><pre><span class="line">1</span><br><span class="line">2</span><br><span class="line">3</span><br><span class="line">4</span><br><span class="line">5</span><br></pre></td><td class="code"><pre><span class="line">upstream backend &#123;  </span><br><span class="line">server server1;  </span><br><span class="line">server server2;  </span><br><span class="line">fair;  </span><br><span class="line">&#125;</span><br></pre></td></tr></table></figure><h5 id="5、url-hash（第三方）"><a href="#5、url-hash（第三方）" class="headerlink" title="5、url_hash（第三方）"></a><strong><a name="5" id="5">5、url_hash（第三方）</a></strong></h5><p>按访问url的hash结果来分配请求，使每个url定向到同一个后端服务器，后端服务器为缓存时比较有效。<br>例：在upstream中加入hash语句，server语句中不能写入weight等其他的参数，hash_method是使用的hash算法</p><figure class="highlight plaintext"><table><tr><td class="gutter"><pre><span class="line">1</span><br><span class="line">2</span><br><span class="line">3</span><br><span class="line">4</span><br><span class="line">5</span><br><span class="line">6</span><br></pre></td><td class="code"><pre><span class="line">upstream backend &#123;  </span><br><span class="line">server squid1:3128;  </span><br><span class="line">server squid2:3128;  </span><br><span class="line">hash $request_uri;  </span><br><span class="line">hash_method crc32;</span><br><span class="line">&#125;</span><br></pre></td></tr></table></figure><h4 id="二、Nginx负载均衡调度状态"><a href="#二、Nginx负载均衡调度状态" class="headerlink" title="二、Nginx负载均衡调度状态"></a>二、Nginx负载均衡调度状态</h4><p>在Nginx upstream模块中，可以设定每台后端服务器在负载均衡调度中的状态，常用的状态有：</p><ul><li><p> 1、down，表示当前的server暂时不参与负载均衡</p></li><li><p> 2、backup，预留的备份机器。当其他所有的非backup机器出现故障或者忙的时候，才会请求backup机器，因此这台机器的访问压力最低</p></li><li><p> 3、max_fails，允许请求失败的次数，默认为1，当超过最大次数时，返回proxy_next_upstream模块定义的错误。</p></li><li><p> 4、fail_timeout，请求失败超时时间，在经历了max_fails次失败后，暂停服务的时间。max_fails和fail_timeout可以一起使用。</p></li></ul><p>如果Nginx没有仅仅只能代理一台服务器的话，那它也不可能像今天这么火，Nginx可以配置代理多台服务器，当一台服务器宕机之后，仍能保持系统可用。具体配置过程如下：<br>在http节点下，添加upstream节点。</p><figure class="highlight plaintext"><table><tr><td class="gutter"><pre><span class="line">1</span><br><span class="line">2</span><br><span class="line">3</span><br><span class="line">4</span><br></pre></td><td class="code"><pre><span class="line">upstream wulaoer &#123;</span><br><span class="line">server 10.0.6.108:7080 weight=1 fail_timeout=2s max_fails=2s;  </span><br><span class="line">server 10.0.0.85:8980 weight=2 fail_timeout=2s max_fails=2s;  </span><br><span class="line">&#125;</span><br></pre></td></tr></table></figure><p>等待时间 = proxy_connect_timeout + fail_timeout * max_fails</p><p>proxy_connect_timeout：与服务器连接的超时时间，默认60s fail_timeout：当该时间内服务器没响应，则认为服务器失效，默认10s max_fails：允许连接失败次数，默认为1将server节点下的location节点中的proxy_pass配置为：http:// + upstream名称，即“ <a href="https://shiroi.top/">https://shiroi.top/”</a>.</p><figure class="highlight plaintext"><table><tr><td class="gutter"><pre><span class="line">1</span><br><span class="line">2</span><br><span class="line">3</span><br><span class="line">4</span><br><span class="line">5</span><br></pre></td><td class="code"><pre><span class="line">location /  &#123;  </span><br><span class="line">root  html;  </span><br><span class="line">index  index.html index.htm;  </span><br><span class="line">proxy_pass https://shiroi.top/; </span><br><span class="line">&#125;</span><br></pre></td></tr></table></figure><p>现在负载均衡初步完成了。upstream按照轮询（默认）方式进行负载，每个请求按时间顺序逐一分配到不同的后端服务器，如果后端服务器down掉，能自动剔除。虽然这种方式简便、成本低廉。但缺点是：可靠性低和负载分配不均衡。适用于图片服务器集群和纯静态页面服务器集群。</p><p>除此之外，upstream还有其它的分配策略，分别如下：</p><p><strong>weight（权重）</strong></p><p>指定轮询几率，weight和访问比率成正比，用于后端服务器性能不均的情况。如下所示，10.0.0.88的访问比率要比10.0.0.77的访问比率高一倍。</p><figure class="highlight plaintext"><table><tr><td class="gutter"><pre><span class="line">1</span><br><span class="line">2</span><br><span class="line">3</span><br><span class="line">4</span><br></pre></td><td class="code"><pre><span class="line">upstream wulaoer&#123;  </span><br><span class="line">server 10.0.0.77 weight=5;  </span><br><span class="line">server 10.0.0.88 weight=10;  </span><br><span class="line">&#125;</span><br></pre></td></tr></table></figure><p><strong>ip_hash（访问ip）</strong></p><p>每个请求按访问ip的hash结果分配，这样每个访客固定访问一个后端服务器，可以解决session的问题。</p><figure class="highlight plaintext"><table><tr><td class="gutter"><pre><span class="line">1</span><br><span class="line">2</span><br><span class="line">3</span><br><span class="line">4</span><br><span class="line">5</span><br></pre></td><td class="code"><pre><span class="line">upstream wulaoer&#123;  </span><br><span class="line">ip_hash;  </span><br><span class="line">server 10.0.0.10:8080;  </span><br><span class="line">server 10.0.0.11:8080;  </span><br><span class="line">&#125;</span><br></pre></td></tr></table></figure><p><strong>fair（第三方）</strong></p><p>按后端服务器的响应时间来分配请求，响应时间短的优先分配。与weight分配策略类似。</p><figure class="highlight plaintext"><table><tr><td class="gutter"><pre><span class="line">1</span><br><span class="line">2</span><br><span class="line">3</span><br><span class="line">4</span><br><span class="line">5</span><br></pre></td><td class="code"><pre><span class="line">upstream wulaoer&#123;  </span><br><span class="line">server 10.0.0.10:8080;  </span><br><span class="line">server 10.0.0.11:8080;  </span><br><span class="line">fair;  </span><br><span class="line">&#125;</span><br></pre></td></tr></table></figure><p><strong>url_hash（第三方）</strong></p><p>按访问url的hash结果来分配请求，使每个url定向到同一个后端服务器，后端服务器为缓存时比较有效。</p><p>注意：在upstream中加入hash语句，server语句中不能写入weight等其他的参数，hash_method是使用的hash算法。</p><figure class="highlight plaintext"><table><tr><td class="gutter"><pre><span class="line">1</span><br><span class="line">2</span><br><span class="line">3</span><br><span class="line">4</span><br><span class="line">5</span><br><span class="line">6</span><br></pre></td><td class="code"><pre><span class="line">upstream resinserver&#123;  </span><br><span class="line">server 10.0.0.10:7777;  </span><br><span class="line">server 10.0.0.11:8888;  </span><br><span class="line">hash $request_uri;  </span><br><span class="line">hash_method crc32;  </span><br><span class="line">&#125;</span><br></pre></td></tr></table></figure><p>upstream还可以为每个设备设置状态值，这些状态值的含义分别如下：</p><p>down 表示单前的server暂时不参与负载.</p><p>weight 默认为1.weight越大，负载的权重就越大。</p><p>max_fails ：允许请求失败的次数默认为1.当超过最大次数时，返回proxy_next_upstream 模块定义的错误.</p><p>fail_timeout : max_fails次失败后，暂停的时间。</p><p>backup： 其它所有的非backup机器down或者忙的时候，请求backup机器。所以这台机器压力会最轻。</p><figure class="highlight plaintext"><table><tr><td class="gutter"><pre><span class="line">1</span><br><span class="line">2</span><br><span class="line">3</span><br><span class="line">4</span><br><span class="line">5</span><br><span class="line">6</span><br><span class="line">7</span><br></pre></td><td class="code"><pre><span class="line">upstream bakend&#123;  #定义负载均衡设备的Ip及设备状态 </span><br><span class="line">ip_hash;  </span><br><span class="line">server 10.0.0.11:9090 down;  </span><br><span class="line">server 10.0.0.11:8080 weight=2;  </span><br><span class="line">server 10.0.0.11:6060;  </span><br><span class="line">server 10.0.0.11:7070 backup;  </span><br><span class="line">&#125;</span><br></pre></td></tr></table></figure>]]>
    </content>
    <id>https://hcr707305003.github.io/2022/01/21/33-nginx%E8%B4%9F%E8%BD%BD%E5%9D%87%E8%A1%A1%E7%9A%84%E5%87%A0%E7%A7%8D%E6%96%B9%E5%BC%8F/</id>
    <link href="https://hcr707305003.github.io/2022/01/21/33-nginx%E8%B4%9F%E8%BD%BD%E5%9D%87%E8%A1%A1%E7%9A%84%E5%87%A0%E7%A7%8D%E6%96%B9%E5%BC%8F/"/>
    <published>2022-01-21T07:55:41.000Z</published>
    <summary>
      <![CDATA[<p>负载均衡默认的配置如下:</p>
<figure class="highlight plaintext"><table><tr><td class="gutter"><pre><span class="line">1</span><br><span class="line"]]>
    </summary>
    <title>33.nginx负载均衡的几种方式</title>
    <updated>2022-01-21T09:02:50.904Z</updated>
  </entry>
  <entry>
    <author>
      <name>Shiroi</name>
    </author>
    <category term="工作心德" scheme="https://hcr707305003.github.io/categories/%E5%B7%A5%E4%BD%9C%E5%BF%83%E5%BE%B7/"/>
    <category term="mysql" scheme="https://hcr707305003.github.io/tags/mysql/"/>
    <category term="索引" scheme="https://hcr707305003.github.io/tags/%E7%B4%A2%E5%BC%95/"/>
    <content>
      <![CDATA[<p>配置mysql的ngram，打开mysql.ini的配置文件，编辑在[mysqld]下面加入这样的配置 </p><pre><code># vim /etc/my.cnf[mysqld]ngram_token_size=2ft_min_word_len=1 //最小分词长度(默认是4，小于4则忽略搜索)</code></pre><p>保存退出，并重启mysql</p><pre><code># service mysql restart</code></pre><p>再登入mysql，并通过命令查看：</p><pre><code>mysql&gt; show variables like &#39;ngram_token_size%&#39;;+------------------+-------+| Variable_name    | Value |+------------------+-------+| ngram_token_size | 1     |+------------------+-------+</code></pre><p>创建测试表</p><pre><code>CREATE TABLE `test` (  `id` int(11) unsigned NOT NULL AUTO_INCREMENT,  `name` varchar(128) DEFAULT NULL,  `data` int(11) DEFAULT NULL,  PRIMARY KEY (`id`),  FULLTEXT KEY `name` (`name`) WITH PARSER ngram ) ENGINE=InnoDB DEFAULT CHARSET=utf8mb4;INSERT INTO test VALUES(null,&#39;welcome to you!&#39;,unix_timestamp());INSERT INTO test VALUES(null,&#39;this is the fan site of you xp 你好&#39;,unix_timestamp());INSERT INTO test VALUES(null,&#39;hello phpjs,you are welcome&#39;,unix_timestamp());INSERT INTO test VALUES(null,&#39;fuck you tomorrow!!&#39;,unix_timestamp());</code></pre><span id="more"></span><pre><code>//查询语句mysql&gt; SELECT *  FROM test WHERE MATCH ( name ) against ( &#39;you&#39; IN BOOLEAN MODE );</code></pre>]]>
    </content>
    <id>https://hcr707305003.github.io/2021/04/06/32-mysql%E5%85%A8%E6%96%87%E7%B4%A2%E5%BC%95%E5%AE%9E%E7%8E%B0%E6%A8%A1%E7%B3%8A%E6%9F%A5%E8%AF%A2/</id>
    <link href="https://hcr707305003.github.io/2021/04/06/32-mysql%E5%85%A8%E6%96%87%E7%B4%A2%E5%BC%95%E5%AE%9E%E7%8E%B0%E6%A8%A1%E7%B3%8A%E6%9F%A5%E8%AF%A2/"/>
    <published>2021-04-06T12:04:01.000Z</published>
    <summary>
      <![CDATA[<p>配置mysql的ngram，打开mysql.ini的配置文件，编辑在[mysqld]下面加入这样的配置 </p>
<pre><code># vim /etc/my.cnf
[mysqld]
ngram_token_size=2
ft_min_word_len=1 //最小分词长度(默认是4，小于4则忽略搜索)
</code></pre>
<p>保存退出，并重启mysql</p>
<pre><code># service mysql restart
</code></pre>
<p>再登入mysql，并通过命令查看：</p>
<pre><code>mysql&gt; show variables like &#39;ngram_token_size%&#39;;
+------------------+-------+
| Variable_name    | Value |
+------------------+-------+
| ngram_token_size | 1     |
+------------------+-------+
</code></pre>
<p>创建测试表</p>
<pre><code>CREATE TABLE `test` (
  `id` int(11) unsigned NOT NULL AUTO_INCREMENT,
  `name` varchar(128) DEFAULT NULL,
  `data` int(11) DEFAULT NULL,
  PRIMARY KEY (`id`),
  FULLTEXT KEY `name` (`name`) WITH PARSER ngram 
) ENGINE=InnoDB DEFAULT CHARSET=utf8mb4;

INSERT INTO test VALUES(null,&#39;welcome to you!&#39;,unix_timestamp());
INSERT INTO test VALUES(null,&#39;this is the fan site of you xp 你好&#39;,unix_timestamp());
INSERT INTO test VALUES(null,&#39;hello phpjs,you are welcome&#39;,unix_timestamp());
INSERT INTO test VALUES(null,&#39;fuck you tomorrow!!&#39;,unix_timestamp());
</code></pre>]]>
    </summary>
    <title>32.mysql全文索引实现模糊查询</title>
    <updated>2022-01-21T08:03:38.744Z</updated>
  </entry>
  <entry>
    <author>
      <name>Shiroi</name>
    </author>
    <category term="工作心德" scheme="https://hcr707305003.github.io/categories/%E5%B7%A5%E4%BD%9C%E5%BF%83%E5%BE%B7/"/>
    <category term="nginx" scheme="https://hcr707305003.github.io/tags/nginx/"/>
    <category term="websocket" scheme="https://hcr707305003.github.io/tags/websocket/"/>
    <category term="ssl" scheme="https://hcr707305003.github.io/tags/ssl/"/>
    <content>
      <![CDATA[<pre><code>location /wss &#123;        proxy_pass http://localhost:2346;        proxy_http_version 1.1;        proxy_set_header Upgrade $http_upgrade;        proxy_set_header Connection &quot;Upgrade&quot;;        proxy_connect_timeout 5s; #配置点1        proxy_read_timeout 60000s; #配置点2，如果没效，可以考虑这个时间配置长一点        proxy_send_timeout 60000s; #配置点3    &#125;</code></pre><p>证书是https的证书，只需要往nginx下新增便可</p>]]>
    </content>
    <id>https://hcr707305003.github.io/2021/04/01/31-%E9%85%8D%E7%BD%AEwebsocket-ssl/</id>
    <link href="https://hcr707305003.github.io/2021/04/01/31-%E9%85%8D%E7%BD%AEwebsocket-ssl/"/>
    <published>2021-04-01T06:36:33.000Z</published>
    <summary>
      <![CDATA[<pre><code>location /wss &#123;
        proxy_pass http://localhost:2346;
        proxy_http_version 1.1;
        proxy_set_header Upgrade $]]>
    </summary>
    <title>31.配置websocket+ssl</title>
    <updated>2022-01-20T08:22:52.648Z</updated>
  </entry>
  <entry>
    <author>
      <name>Shiroi</name>
    </author>
    <category term="工作心德" scheme="https://hcr707305003.github.io/categories/%E5%B7%A5%E4%BD%9C%E5%BF%83%E5%BE%B7/"/>
    <category term="php" scheme="https://hcr707305003.github.io/tags/php/"/>
    <category term="composer" scheme="https://hcr707305003.github.io/tags/composer/"/>
    <content>
      <![CDATA[<pre><code>composer install --ignore-platform-reqs//安装orcomposer update --ignore-platform-reqs//更新</code></pre>]]>
    </content>
    <id>https://hcr707305003.github.io/2021/03/19/30-composer%E5%BF%BD%E7%95%A5%E7%89%88%E6%9C%AC%E5%8F%B7/</id>
    <link href="https://hcr707305003.github.io/2021/03/19/30-composer%E5%BF%BD%E7%95%A5%E7%89%88%E6%9C%AC%E5%8F%B7/"/>
    <published>2021-03-19T01:14:01.000Z</published>
    <summary>
      <![CDATA[<pre><code>composer install --ignore-platform-reqs//安装
or
composer update --ignore-platform-reqs//更新
</code></pre>]]>
    </summary>
    <title>30.composer忽略版本号</title>
    <updated>2022-01-20T08:22:41.220Z</updated>
  </entry>
  <entry>
    <author>
      <name>Shiroi</name>
    </author>
    <category term="闲余" scheme="https://hcr707305003.github.io/categories/%E9%97%B2%E4%BD%99/"/>
    <category term="chrome" scheme="https://hcr707305003.github.io/tags/chrome/"/>
    <content>
      <![CDATA[<ol><li>打开 Chrome 浏览器，国产 Chrome 内核的浏览器通通适用，包括前段时间推送的新版 Edge 也可以</li><li>在地址栏输入 chrome://flags/#enable-parallel-downloading</li><li>打开后如下图模式<br><img src="https://shiroi.top/usr/uploads/2020/12/403576355.jpg" alt="201911201574231257754319.jpg"></li><li>选择“Enable”，出现”Relaunch”(重启浏览器)，点击它</li><li>重启后就开启了多线程下载功能，接下来咱们再来看看之前文件的下载速度。</li><li><img src="https://shiroi.top/usr/uploads/2020/12/1287768948.gif" alt="201911201574231315160445.gif"></li></ol>]]>
    </content>
    <id>https://hcr707305003.github.io/2020/12/09/29-%E5%BC%80%E5%90%AFChrome%E8%87%AA%E5%B8%A6%E7%9A%84%E5%A4%9A%E7%BA%BF%E7%A8%8B%E4%B8%8B%E8%BD%BD%E5%8A%9F%E8%83%BD/</id>
    <link href="https://hcr707305003.github.io/2020/12/09/29-%E5%BC%80%E5%90%AFChrome%E8%87%AA%E5%B8%A6%E7%9A%84%E5%A4%9A%E7%BA%BF%E7%A8%8B%E4%B8%8B%E8%BD%BD%E5%8A%9F%E8%83%BD/"/>
    <published>2020-12-09T08:47:37.000Z</published>
    <summary>
      <![CDATA[<ol>
<li>打开 Chrome 浏览器，国产 Chrome 内核的浏览器通通适用，包括前段时间推送的新版 Edge 也可以</li>
<li>在地址栏输入 chrome://flags/#enable-parallel-downloading</li>
<li>打开后如下图]]>
    </summary>
    <title>29.开启Chrome自带的多线程下载功能</title>
    <updated>2022-01-20T08:22:32.014Z</updated>
  </entry>
  <entry>
    <author>
      <name>Shiroi</name>
    </author>
    <category term="工作心德" scheme="https://hcr707305003.github.io/categories/%E5%B7%A5%E4%BD%9C%E5%BF%83%E5%BE%B7/"/>
    <category term="php" scheme="https://hcr707305003.github.io/tags/php/"/>
    <category term="laravel" scheme="https://hcr707305003.github.io/tags/laravel/"/>
    <content>
      <![CDATA[<pre><code>$routes = app()-&gt;router-&gt;getRoutes();//第一种foreach ($routes as $k =&gt; $value) &#123;    if($value-&gt;action[&#39;namespace&#39;] == &#39;App\Http\Controllers\Api&#39;) &#123;        $path[$k][&#39;uri&#39;] = $value-&gt;uri;        $path[$k][&#39;path&#39;] = $value-&gt;methods[0];    &#125;&#125;dump($path);//第二种$data = [];$routes = collect($routes)-&gt;map(function ($route) use ($data) &#123;    if($route-&gt;action[&#39;namespace&#39;] == &#39;App\Http\Controllers\Api&#39;) &#123;        $data[&#39;uri&#39;] = $route-&gt;uri;        $data[&#39;path&#39;] = $route-&gt;methods[0];    &#125;    return $data;&#125;)-&gt;filter()-&gt;all();dump($routes);</code></pre>]]>
    </content>
    <id>https://hcr707305003.github.io/2020/10/05/28-laravel%E8%8E%B7%E5%8F%96%E8%B7%AF%E7%94%B1%E7%9A%84%E4%B8%A4%E7%A7%8D%E6%96%B9%E5%BC%8F/</id>
    <link href="https://hcr707305003.github.io/2020/10/05/28-laravel%E8%8E%B7%E5%8F%96%E8%B7%AF%E7%94%B1%E7%9A%84%E4%B8%A4%E7%A7%8D%E6%96%B9%E5%BC%8F/"/>
    <published>2020-10-05T04:12:45.000Z</published>
    <summary>
      <![CDATA[<pre><code>$routes = app()-&gt;router-&gt;getRoutes();
//第一种
foreach ($routes as $k =&gt; $value) &#123;
    if($value-&gt;action[&#39;names]]>
    </summary>
    <title>28.laravel获取路由的两种方式</title>
    <updated>2022-01-20T08:22:28.580Z</updated>
  </entry>
  <entry>
    <author>
      <name>Shiroi</name>
    </author>
    <category term="工作心德" scheme="https://hcr707305003.github.io/categories/%E5%B7%A5%E4%BD%9C%E5%BF%83%E5%BE%B7/"/>
    <category term="算法" scheme="https://hcr707305003.github.io/categories/%E5%B7%A5%E4%BD%9C%E5%BF%83%E5%BE%B7/%E7%AE%97%E6%B3%95/"/>
    <category term="php" scheme="https://hcr707305003.github.io/tags/php/"/>
    <category term="算法" scheme="https://hcr707305003.github.io/tags/%E7%AE%97%E6%B3%95/"/>
    <content>
      <![CDATA[<p><strong>数组</strong><br>    $array = [<br>        [<br>            “username”=&gt;”xiaxian2”,<br>            “headimg”=&gt;”/Templates/home/res/face/3.png”,<br>            “money”=&gt;”99500.00”,<br>            “yongjin”=&gt;”0.00”,<br>            “yongjingai”=&gt;”0”,<br>            “jiesuan”=&gt;”0.00”,<br>            “agent”=&gt;”8e5d35bf1414296e03c7846ebab7af6e”,<br>            “userid”=&gt;”09b42ce90879719a67f050b431b03534”,<br>            “zongliushui”=&gt;”500”,<br>            “zongyinkui”=&gt;null<br>        ],<br>        [<br>            “username”=&gt;”erjixiaxian2”,<br>            “headimg”=&gt;”/Templates/home/res/face/3.png”,<br>            “money”=&gt;”99400.00”,<br>            “yongjin”=&gt;”0.00”,<br>            “yongjingai”=&gt;”0”,<br>            “jiesuan”=&gt;”0.00”,<br>            “agent”=&gt;”e89c3cb72cc95e2e7014d3d07b97beb2”,<br>            “userid”=&gt;”2a1ab4890db2142c6c0bb51ef77994fb”,<br>            “zongliushui”=&gt;”600”,<br>            “zongyinkui”=&gt;null<br>        ],<br>        [<br>            “username”=&gt;”erjixiaxian”,<br>            “headimg”=&gt;”/Templates/home/res/face/3.png”,<br>            “money”=&gt;”100592.80”,<br>            “yongjin”=&gt;”0.00”,<br>            “yongjingai”=&gt;”0”,<br>            “jiesuan”=&gt;”0.00”,<br>            “agent”=&gt;”e89c3cb72cc95e2e7014d3d07b97beb2”,<br>            “userid”=&gt;”6256d265dcc1e9cfca2c37c1093444cb”,<br>            “zongliushui”=&gt;”600”,<br>            “zongyinkui”=&gt;”592.8”<br>        ],<br>        [<br>            “username”=&gt;”admin”,<br>            “headimg”=&gt;”/Templates/home/res/face/2.png”,<br>            “money”=&gt;”11038.83”,<br>            “yongjin”=&gt;”1.50”,<br>            “yongjingai”=&gt;”1”,<br>            “jiesuan”=&gt;”7.50”,<br>            “agent”=&gt;”7d9e993765d4f79748ec54cbed9a996e”,<br>            “userid”=&gt;”8e5d35bf1414296e03c7846ebab7af6e”,<br>            “zongliushui”=&gt;”5821”,<br>            “zongyinkui”=&gt;”8351.548”<br>        ],<br>        [<br>            “username”=&gt;”xiaxian1”,<br>            “headimg”=&gt;”/Templates/home/res/face/3.png”,<br>            “money”=&gt;”97494.00”,<br>            “yongjin”=&gt;”0.00”,<br>            “yongjingai”=&gt;”0”,<br>            “jiesuan”=&gt;”0.00”,<br>            “agent”=&gt;”8e5d35bf1414296e03c7846ebab7af6e”,<br>            “userid”=&gt;”e89c3cb72cc95e2e7014d3d07b97beb2”,<br>            “zongliushui”=&gt;”3500”,<br>            “zongyinkui”=&gt;”-2006”<br>        ]<br>    ];</p><p><strong>引用算法</strong></p><pre><code>//引用算法function generateTree($array)&#123;    //第一步 构造数据    $items = array();    foreach($array as $value)&#123;        $items[$value[&#39;userid&#39;]] = $value;    &#125;    //第二部 遍历数据 生成树状结构    $tree = array();    foreach($items as $key =&gt; $value)&#123;        if(isset($items[$value[&#39;agent&#39;]]))&#123;            $items[$value[&#39;agent&#39;]][&#39;son&#39;][] = &amp;$items[$key];        &#125;else&#123;            $tree[] = &amp;$items[$key];        &#125;    &#125;    return $tree;&#125;$a = generateTree($array);dd($a);</code></pre><p><strong>结果</strong></p><pre><code>[    &#123;        &quot;username&quot;: &quot;admin&quot;,        &quot;headimg&quot;: &quot;/Templates/home/res/face/2.png&quot;,        &quot;money&quot;: &quot;11038.83&quot;,        &quot;yongjin&quot;: &quot;1.50&quot;,        &quot;yongjingai&quot;: &quot;1&quot;,        &quot;jiesuan&quot;: &quot;7.50&quot;,        &quot;agent&quot;: &quot;7d9e993765d4f79748ec54cbed9a996e&quot;,        &quot;userid&quot;: &quot;8e5d35bf1414296e03c7846ebab7af6e&quot;,        &quot;zongliushui&quot;: &quot;5821&quot;,        &quot;zongyinkui&quot;: &quot;8351.548&quot;,        &quot;son&quot;: [            &#123;                &quot;username&quot;: &quot;xiaxian2&quot;,                &quot;headimg&quot;: &quot;/Templates/home/res/face/3.png&quot;,                &quot;money&quot;: &quot;99500.00&quot;,                &quot;yongjin&quot;: &quot;0.00&quot;,                &quot;yongjingai&quot;: &quot;0&quot;,                &quot;jiesuan&quot;: &quot;0.00&quot;,                &quot;agent&quot;: &quot;8e5d35bf1414296e03c7846ebab7af6e&quot;,                &quot;userid&quot;: &quot;09b42ce90879719a67f050b431b03534&quot;,                &quot;zongliushui&quot;: &quot;500&quot;,                &quot;zongyinkui&quot;: null            &#125;,            &#123;                &quot;username&quot;: &quot;xiaxian1&quot;,                &quot;headimg&quot;: &quot;/Templates/home/res/face/3.png&quot;,                &quot;money&quot;: &quot;97494.00&quot;,                &quot;yongjin&quot;: &quot;0.00&quot;,                &quot;yongjingai&quot;: &quot;0&quot;,                &quot;jiesuan&quot;: &quot;0.00&quot;,                &quot;agent&quot;: &quot;8e5d35bf1414296e03c7846ebab7af6e&quot;,                &quot;userid&quot;: &quot;e89c3cb72cc95e2e7014d3d07b97beb2&quot;,                &quot;zongliushui&quot;: &quot;3500&quot;,                &quot;zongyinkui&quot;: &quot;-2006&quot;,                &quot;son&quot;: [                    Array(),                    Array()                ]            &#125;        ]    &#125;]</code></pre><span id="more"></span>]]>
    </content>
    <id>https://hcr707305003.github.io/2020/08/28/27-%E6%A0%B9%E6%8D%AE%E5%88%86%E7%B1%BB%E5%AE%9E%E7%8E%B0%E6%97%A0%E9%99%90%E7%BA%A7/</id>
    <link href="https://hcr707305003.github.io/2020/08/28/27-%E6%A0%B9%E6%8D%AE%E5%88%86%E7%B1%BB%E5%AE%9E%E7%8E%B0%E6%97%A0%E9%99%90%E7%BA%A7/"/>
    <published>2020-08-28T02:49:23.000Z</published>
    <summary>
      <![CDATA[<p><strong>数组</strong><br>    $array = [<br>        [<br>            “username”=&gt;”xiaxian2”,<br>            “headimg”=&gt;”/Templates/home/res/face/3.png”,<br>            “money”=&gt;”99500.00”,<br>            “yongjin”=&gt;”0.00”,<br>            “yongjingai”=&gt;”0”,<br>            “jiesuan”=&gt;”0.00”,<br>            “agent”=&gt;”8e5d35bf1414296e03c7846ebab7af6e”,<br>            “userid”=&gt;”09b42ce90879719a67f050b431b03534”,<br>            “zongliushui”=&gt;”500”,<br>            “zongyinkui”=&gt;null<br>        ],<br>        [<br>            “username”=&gt;”erjixiaxian2”,<br>            “headimg”=&gt;”/Templates/home/res/face/3.png”,<br>            “money”=&gt;”99400.00”,<br>            “yongjin”=&gt;”0.00”,<br>            “yongjingai”=&gt;”0”,<br>            “jiesuan”=&gt;”0.00”,<br>            “agent”=&gt;”e89c3cb72cc95e2e7014d3d07b97beb2”,<br>            “userid”=&gt;”2a1ab4890db2142c6c0bb51ef77994fb”,<br>            “zongliushui”=&gt;”600”,<br>            “zongyinkui”=&gt;null<br>        ],<br>        [<br>            “username”=&gt;”erjixiaxian”,<br>            “headimg”=&gt;”/Templates/home/res/face/3.png”,<br>            “money”=&gt;”100592.80”,<br>            “yongjin”=&gt;”0.00”,<br>            “yongjingai”=&gt;”0”,<br>            “jiesuan”=&gt;”0.00”,<br>            “agent”=&gt;”e89c3cb72cc95e2e7014d3d07b97beb2”,<br>            “userid”=&gt;”6256d265dcc1e9cfca2c37c1093444cb”,<br>            “zongliushui”=&gt;”600”,<br>            “zongyinkui”=&gt;”592.8”<br>        ],<br>        [<br>            “username”=&gt;”admin”,<br>            “headimg”=&gt;”/Templates/home/res/face/2.png”,<br>            “money”=&gt;”11038.83”,<br>            “yongjin”=&gt;”1.50”,<br>            “yongjingai”=&gt;”1”,<br>            “jiesuan”=&gt;”7.50”,<br>            “agent”=&gt;”7d9e993765d4f79748ec54cbed9a996e”,<br>            “userid”=&gt;”8e5d35bf1414296e03c7846ebab7af6e”,<br>            “zongliushui”=&gt;”5821”,<br>            “zongyinkui”=&gt;”8351.548”<br>        ],<br>        [<br>            “username”=&gt;”xiaxian1”,<br>            “headimg”=&gt;”/Templates/home/res/face/3.png”,<br>            “money”=&gt;”97494.00”,<br>            “yongjin”=&gt;”0.00”,<br>            “yongjingai”=&gt;”0”,<br>            “jiesuan”=&gt;”0.00”,<br>            “agent”=&gt;”8e5d35bf1414296e03c7846ebab7af6e”,<br>            “userid”=&gt;”e89c3cb72cc95e2e7014d3d07b97beb2”,<br>            “zongliushui”=&gt;”3500”,<br>            “zongyinkui”=&gt;”-2006”<br>        ]<br>    ];</p>
<p><strong>引用算法</strong></p>
<pre><code>//引用算法
function generateTree($array)&#123;
    //第一步 构造数据
    $items = array();
    foreach($array as $value)&#123;
        $items[$value[&#39;userid&#39;]] = $value;
    &#125;
    //第二部 遍历数据 生成树状结构
    $tree = array();
    foreach($items as $key =&gt; $value)&#123;
        if(isset($items[$value[&#39;agent&#39;]]))&#123;
            $items[$value[&#39;agent&#39;]][&#39;son&#39;][] = &amp;$items[$key];
        &#125;else&#123;
            $tree[] = &amp;$items[$key];
        &#125;
    &#125;
    return $tree;
&#125;

$a = generateTree($array);
dd($a);
</code></pre>
<p><strong>结果</strong></p>
<pre><code>[
    &#123;
        &quot;username&quot;: &quot;admin&quot;,
        &quot;headimg&quot;: &quot;/Templates/home/res/face/2.png&quot;,
        &quot;money&quot;: &quot;11038.83&quot;,
        &quot;yongjin&quot;: &quot;1.50&quot;,
        &quot;yongjingai&quot;: &quot;1&quot;,
        &quot;jiesuan&quot;: &quot;7.50&quot;,
        &quot;agent&quot;: &quot;7d9e993765d4f79748ec54cbed9a996e&quot;,
        &quot;userid&quot;: &quot;8e5d35bf1414296e03c7846ebab7af6e&quot;,
        &quot;zongliushui&quot;: &quot;5821&quot;,
        &quot;zongyinkui&quot;: &quot;8351.548&quot;,
        &quot;son&quot;: [
            &#123;
                &quot;username&quot;: &quot;xiaxian2&quot;,
                &quot;headimg&quot;: &quot;/Templates/home/res/face/3.png&quot;,
                &quot;money&quot;: &quot;99500.00&quot;,
                &quot;yongjin&quot;: &quot;0.00&quot;,
                &quot;yongjingai&quot;: &quot;0&quot;,
                &quot;jiesuan&quot;: &quot;0.00&quot;,
                &quot;agent&quot;: &quot;8e5d35bf1414296e03c7846ebab7af6e&quot;,
                &quot;userid&quot;: &quot;09b42ce90879719a67f050b431b03534&quot;,
                &quot;zongliushui&quot;: &quot;500&quot;,
                &quot;zongyinkui&quot;: null
            &#125;,
            &#123;
                &quot;username&quot;: &quot;xiaxian1&quot;,
                &quot;headimg&quot;: &quot;/Templates/home/res/face/3.png&quot;,
                &quot;money&quot;: &quot;97494.00&quot;,
                &quot;yongjin&quot;: &quot;0.00&quot;,
                &quot;yongjingai&quot;: &quot;0&quot;,
                &quot;jiesuan&quot;: &quot;0.00&quot;,
                &quot;agent&quot;: &quot;8e5d35bf1414296e03c7846ebab7af6e&quot;,
                &quot;userid&quot;: &quot;e89c3cb72cc95e2e7014d3d07b97beb2&quot;,
                &quot;zongliushui&quot;: &quot;3500&quot;,
                &quot;zongyinkui&quot;: &quot;-2006&quot;,
                &quot;son&quot;: [
                    Array(),
                    Array()
                ]
            &#125;
        ]
    &#125;
]
</code></pre>]]>
    </summary>
    <title>27.根据分类实现无限级</title>
    <updated>2022-01-20T08:22:21.048Z</updated>
  </entry>
  <entry>
    <author>
      <name>Shiroi</name>
    </author>
    <category term="工作心德" scheme="https://hcr707305003.github.io/categories/%E5%B7%A5%E4%BD%9C%E5%BF%83%E5%BE%B7/"/>
    <category term="mysql" scheme="https://hcr707305003.github.io/tags/mysql/"/>
    <content>
      <![CDATA[<p><strong>表一：</strong><br>    CREATE TABLE <code>log_zz</code> (<br>      <code>dt</code> datetime NOT NULL,<br>      <code>info</code> varchar(100) NOT NULL,<br>      KEY <code>dt</code> (<code>dt</code>)<br>    ) ENGINE=MyISAM DEFAULT CHARSET=utf8;</p><p><strong>表二：</strong><br>    CREATE TABLE <code>log_xx</code> (<br>      <code>dt</code> datetime NOT NULL,<br>      <code>info</code> varchar(100) NOT NULL,<br>      KEY <code>dt</code> (<code>dt</code>)<br>    ) ENGINE=MyISAM DEFAULT CHARSET=utf8;</p><p><strong>表三：</strong><br>    CREATE TABLE <code>log_yy</code> (<br>      <code>dt</code> datetime NOT NULL,<br>      <code>info</code> varchar(100) NOT NULL,<br>      KEY <code>dt</code> (<code>dt</code>)<br>    ) ENGINE=MyISAM DEFAULT CHARSET=utf8;</p><p><strong>关联表：</strong></p><pre><code>CREATE TABLE `log_merge` (  `dt` datetime NOT NULL,  `info` varchar(100) NOT NULL,  KEY `dt` (`dt`)) ENGINE=MRG_MyISAM DEFAULT CHARSET=utf8 UNION=(`log_zz`,`log_xx`,`log_yy`);</code></pre><p>** 这是三张表的数据： **<br><img src="https://shiroi.top/usr/uploads/2020/08/3291075295.png" alt="D5Q7}IL{10TRQGAF@47D~61.png"></p><p>** 这是关联表的数据： **</p><p><img src="https://shiroi.top/usr/uploads/2020/08/2043609497.png" alt="关联表数据"></p><p>** 执行代码 **<br>    查询：select * from log_merge;<br>    删除：delete from log_merge where <code>dt</code>=’2020-08-10 10:48:53’;<br>    更新：update table where  <code>dt</code>=’2020-08-10 10:48:53’ set <code>info</code> = ‘SS’;</p>]]>
    </content>
    <id>https://hcr707305003.github.io/2020/08/12/26-mysql-%E6%95%B0%E6%8D%AE%E5%BA%93%E5%85%B3%E8%81%94%E5%A4%9A%E5%BC%A0%E8%A1%A8/</id>
    <link href="https://hcr707305003.github.io/2020/08/12/26-mysql-%E6%95%B0%E6%8D%AE%E5%BA%93%E5%85%B3%E8%81%94%E5%A4%9A%E5%BC%A0%E8%A1%A8/"/>
    <published>2020-08-12T06:47:39.000Z</published>
    <summary>
      <![CDATA[<p><strong>表一：</strong><br>    CREATE TABLE <code>log_zz</code> (<br>      <code>dt</code> datetime NOT NULL,<br>      <code>info</code> var]]>
    </summary>
    <title>26.mysql 数据库关联多张表</title>
    <updated>2022-01-20T08:22:11.722Z</updated>
  </entry>
  <entry>
    <author>
      <name>Shiroi</name>
    </author>
    <category term="工作心德" scheme="https://hcr707305003.github.io/categories/%E5%B7%A5%E4%BD%9C%E5%BF%83%E5%BE%B7/"/>
    <category term="php" scheme="https://hcr707305003.github.io/tags/php/"/>
    <category term="composer" scheme="https://hcr707305003.github.io/tags/composer/"/>
    <content>
      <![CDATA[<p>##composer支持四种模式(psr0,psr4,classmap,files)##<br><strong>composer默认psr4,支持php5.2</strong><br>PSR-4指定的就当作当前命名空间的目录， 而PSR-0 指定的是当前命名空间的父目录。composer dump-autoload 一下</p><pre><code>&lt;?php//实现自动加载类spl_autoload_register(function ($class) &#123;    /* 限定类名路径映射 */    $class_map = array(        // 限定类名 =&gt; 文件路径        $class =&gt; $class.&quot;.php&quot;,    );    /* 引入相关文件 */    if (file_exists($file = $class_map[$class])) include $file;&#125;);//按照顺序加载(按照命名空间寻找)$aa =new \classes\AA();$aa-&gt;aa();echo &quot;\n&quot;;$bb = new \classes\BB();$bb-&gt;bb();echo &quot;\n&quot;;$sasasaasds = new \saadsadsas\sasasaasds();$sasasaasds-&gt;wqwqwq();echo &quot;\n&quot;;$fwqdqwd = new \wqeqweqw\fwqdqwd();$fwqdqwd-&gt;尼玛();</code></pre><p>sql_autoload_register() 函数 跟 __autoload()相比,<br>1.__autoload($class) 因为是一个函数，所以只能定义一次，使用多个会冲突报错;而 sql_autoload_register(‘function’) 可定义多个，它有效地创建一个队列的自动装载函数并按顺序依次定义</p><p>2.SPL函数很丰富，有更多的操作空间:如spl_autoload_unregister()注销已经注册的函数、spl_autoload_functions()返回所有已经注册的函数等</p>]]>
    </content>
    <id>https://hcr707305003.github.io/2020/05/15/25-composer%E7%9A%84%E8%87%AA%E5%8A%A8%E5%8A%A0%E8%BD%BD%E6%9C%BA%E5%88%B6/</id>
    <link href="https://hcr707305003.github.io/2020/05/15/25-composer%E7%9A%84%E8%87%AA%E5%8A%A8%E5%8A%A0%E8%BD%BD%E6%9C%BA%E5%88%B6/"/>
    <published>2020-05-15T07:06:14.000Z</published>
    <summary>
      <![CDATA[<p>##composer支持四种模式(psr0,psr4,classmap,files)##<br><strong>composer默认psr4,支持php5.2</strong><br>PSR-4指定的就当作当前命名空间的目录， 而PSR-0 指定的是当前命名空间的父目录。c]]>
    </summary>
    <title>25.composer的自动加载机制</title>
    <updated>2022-01-20T08:22:07.278Z</updated>
  </entry>
  <entry>
    <author>
      <name>Shiroi</name>
    </author>
    <category term="工作心德" scheme="https://hcr707305003.github.io/categories/%E5%B7%A5%E4%BD%9C%E5%BF%83%E5%BE%B7/"/>
    <category term="php" scheme="https://hcr707305003.github.io/tags/php/"/>
    <category term="laravel" scheme="https://hcr707305003.github.io/tags/laravel/"/>
    <category term="mac" scheme="https://hcr707305003.github.io/tags/mac/"/>
    <category term="微服务" scheme="https://hcr707305003.github.io/tags/%E5%BE%AE%E6%9C%8D%E5%8A%A1/"/>
    <content>
      <![CDATA[<p>这里使用的是laravel框架，基于laravel的组件larvels(laravel+swoole)</p><pre><code>LaravelS 基于 Swoole 加速 Laravel/Lumen，常驻内存，内置 HTTP/WebSocket Server，支持 TCP/UDP Server、自定义进程、异步的事件监听、异步任务队列、毫秒级定时任务、平滑 Reload，与 Nginx 配合搭建高可用分布式服务器群，开箱即用。</code></pre><p>1、 安装laravel框架(这步直接省略)<br>2、 直接安装laravelS</p><pre><code>composer require &quot;hhxsv5/laravel-s:~3.5.0&quot; -vvv</code></pre><p>3、 注册Service Provider<br>修改文件 <code>config/app.php</code></p><pre><code> &#39;providers&#39; =&gt; [        Hhxsv5\LaravelS\Illuminate\LaravelSServiceProvider::class,    ],</code></pre><p>4、 发布配置和二进制文件</p><p><code>php artisan laravels publish</code>，<code>config\laravels.php</code>就是你配置文件</p><p>5、 运行</p><pre><code>php bin/laravels start</code></pre><p><img src="https://shiroi.top/usr/uploads/2020/05/1132575480.png" alt="1F999F85-406B-4AD7-8E72-B95CD21F632E.png"><br>这样就算是初步完成启动了，通过<code>config\laravels.php</code>配置的端口通过http请求完成访问</p><p>6.将ip发布到nginx并配置一个域名</p><ul><li>修改 nginx.conf 文件将<code>include servers/*.conf</code>并新建一个servers文件夹(有就不需要啦)</li><li>这里我新建了一个aa.conf(随便建的)</li></ul><pre><code>gzip on;gzip_min_length 1024;gzip_comp_level 2;gzip_types text/plain text/css text/javascript application/json application/javascript application/x-javascript application/xml application/x-httpd-php image/jpeg image/gif image/png font/ttf font/otf image/svg+xml;gzip_vary on;gzip_disable &quot;msie6&quot;;#nginx upstream用于负载均衡upstream swoole &#123;    # 通过 IP:Port 连接    #多服务器负载均衡(没有服务器，拿端口来顶替),模拟多个服务器    server 127.0.0.1:5200 weight=5 max_fails=3 fail_timeout=5s;#可设置参数请求    server 127.0.0.1:5201 weight=5 max_fails=3 fail_timeout=5s;#可设置参数请求    # 通过 UnixSocket Stream 连接，小诀窍：将socket文件放在/dev/shm目录下，可获得更好的性能    #server unix:/yourpath/laravel-s-test/storage/laravels.sock weight=5 max_fails=3 fail_timeout=30s;    #server 192.168.1.1:5200 weight=3 max_fails=3 fail_timeout=30s;    #server 192.168.1.2:5200 backup;    keepalive 16;&#125;server &#123;    listen       80;    client_max_body_size 512m;    server_name  aa.com;    # root  /Users/huchaoran/Desktop/所有项目/muchTemplate/public;    autoindex off;    index index.html index.php;    location / &#123;        # try_files $uri $uri/ /index.php?$query_string;        try_files $uri @laravels;    &#125;    # location ~ \.php(.*)$ &#123;    #       fastcgi_pass   127.0.0.1:9000;    #        fastcgi_index  index.php;    #        fastcgi_split_path_info  ^((?U).+\.php)(/?.+)$;    #        fastcgi_param  SCRIPT_FILENAME  $document_root$fastcgi_script_name;    #        fastcgi_param  PATH_INFO  $fastcgi_path_info;    #        fastcgi_param  PATH_TRANSLATED  $document_root$fastcgi_path_info;    #       include        fastcgi_params;    # &#125;    # location ~ /\.ht &#123;    #     deny all;    # &#125;    # if (!-e $request_filename) &#123;    #     rewrite ^/(.*)$ /index.php/$1;    # &#125;    location @laravels &#123;        # proxy_connect_timeout 60s;        # proxy_send_timeout 60s;        # proxy_read_timeout 120s;        proxy_http_version 1.1;        proxy_set_header Connection &quot;&quot;;        proxy_set_header X-Real-IP $remote_addr;        proxy_set_header X-Real-PORT $remote_port;        proxy_set_header X-Forwarded-For $proxy_add_x_forwarded_for;        proxy_set_header Host $http_host;        proxy_set_header Scheme $scheme;        proxy_set_header Server-Protocol $server_protocol;        proxy_set_header Server-Name $server_name;        proxy_set_header Server-Addr $server_addr;        proxy_set_header Server-Port $server_port;        access_log  /Users/huchaoran/Desktop/所有项目/muchTemplate/access.log;        # “swoole”是指上面的upstream定义的swoole        proxy_pass http://swoole;    &#125;&#125;</code></pre><ul><li>填写完后重启nginx服务器<code>brew services restart nginx</code>,在<code>hosts</code>文件配一个<code>aa.com</code>,再通过请求<code>http://aa.com</code>就能看到项目了<br><img src="https://shiroi.top/usr/uploads/2020/05/131971799.png" alt="D2BB0143-EAA6-42DC-86DB-BB9BB046E11B.png"></li><li>手动die掉一个也发现能正常运行哦<br><img src="https://shiroi.top/usr/uploads/2020/05/1855470610.png" alt="311A94CA-2E1B-4197-81C3-EA9EA7DC5198.png"></li></ul><p>这里就完成了搭建laravel微服务，后面的我会一步步更新的</p>]]>
    </content>
    <id>https://hcr707305003.github.io/2020/05/05/24-mac%E6%90%AD%E5%BB%BA%E8%87%AA%E5%B7%B1%E7%9A%84%E5%BE%AE%E6%9C%8D%E5%8A%A1/</id>
    <link href="https://hcr707305003.github.io/2020/05/05/24-mac%E6%90%AD%E5%BB%BA%E8%87%AA%E5%B7%B1%E7%9A%84%E5%BE%AE%E6%9C%8D%E5%8A%A1/"/>
    <published>2020-05-05T12:18:40.000Z</published>
    <summary>
      <![CDATA[<p>这里使用的是laravel框架，基于laravel的组件larvels(laravel+swoole)</p>
<pre><code>LaravelS 基于 Swoole 加速 Laravel/Lumen，常驻内存，内置 HTTP/WebSocket Server，支持 T]]>
    </summary>
    <title>24.mac搭建自己的微服务</title>
    <updated>2022-01-20T08:21:59.713Z</updated>
  </entry>
  <entry>
    <author>
      <name>Shiroi</name>
    </author>
    <category term="工作心德" scheme="https://hcr707305003.github.io/categories/%E5%B7%A5%E4%BD%9C%E5%BF%83%E5%BE%B7/"/>
    <category term="算法" scheme="https://hcr707305003.github.io/categories/%E5%B7%A5%E4%BD%9C%E5%BF%83%E5%BE%B7/%E7%AE%97%E6%B3%95/"/>
    <category term="php" scheme="https://hcr707305003.github.io/tags/php/"/>
    <category term="算法" scheme="https://hcr707305003.github.io/tags/%E7%AE%97%E6%B3%95/"/>
    <content>
      <![CDATA[<h2 id="公鷄5元一隻-母鷄2元一隻-小鷄1元3只，100元可以買100只，求公鷄、母鷄、小鷄共多少隻"><a href="#公鷄5元一隻-母鷄2元一隻-小鷄1元3只，100元可以買100只，求公鷄、母鷄、小鷄共多少隻" class="headerlink" title="公鷄5元一隻,母鷄2元一隻,小鷄1元3只，100元可以買100只，求公鷄、母鷄、小鷄共多少隻"></a>公鷄5元一隻,母鷄2元一隻,小鷄1元3只，100元可以買100只，求公鷄、母鷄、小鷄共多少隻</h2><p>分析：假设有$i只鸡,$j只母鸡,$k只小鸡,并且$i+$j+$k的总数为100,即$i<em>5+$j</em>3+$k/3=100($k必须是3的倍数)<br>    $count = 100;<br>    function countNum($count) {<br>        for ($i = 1; $i &lt; $count; $i++) {<br>            for ($j = 1; $j &lt; $count; $j++) {<br>                for ($k = 3; $k &lt; $count; $k = $k+3) {<br>                    if(($i+$j+$k==$count) &amp;&amp; ($i<em>5+$j</em>3+$k/3==$count)){<br>                        var_dump(“公鷄:{$i}只,母鷄:{$j}只,小鷄:{$k}只”);<br>                    }<br>                }<br>            }<br>        }<br>    }</p>]]>
    </content>
    <id>https://hcr707305003.github.io/2020/04/21/23-%E7%99%BE%E9%92%B1%E4%B9%B0%E7%99%BE%E9%B8%A1/</id>
    <link href="https://hcr707305003.github.io/2020/04/21/23-%E7%99%BE%E9%92%B1%E4%B9%B0%E7%99%BE%E9%B8%A1/"/>
    <published>2020-04-21T06:32:09.000Z</published>
    <summary>
      <![CDATA[<h2 id="公鷄5元一隻-母鷄2元一隻-小鷄1元3只，100元可以買100只，求公鷄、母鷄、小鷄共多少隻"><a href="#公鷄5元一隻-母鷄2元一隻-小鷄1元3只，100元可以買100只，求公鷄、母鷄、小鷄共多少隻" class="headerlink" title="]]>
    </summary>
    <title>23.百钱买百鸡</title>
    <updated>2022-01-20T08:21:41.835Z</updated>
  </entry>
  <entry>
    <author>
      <name>Shiroi</name>
    </author>
    <category term="工作心德" scheme="https://hcr707305003.github.io/categories/%E5%B7%A5%E4%BD%9C%E5%BF%83%E5%BE%B7/"/>
    <category term="算法" scheme="https://hcr707305003.github.io/categories/%E5%B7%A5%E4%BD%9C%E5%BF%83%E5%BE%B7/%E7%AE%97%E6%B3%95/"/>
    <category term="php" scheme="https://hcr707305003.github.io/tags/php/"/>
    <category term="算法" scheme="https://hcr707305003.github.io/tags/%E7%AE%97%E6%B3%95/"/>
    <content>
      <![CDATA[<pre><code>&lt;?phpfunction generateTree($array)&#123;    //第一步 构造数据    $items = array();    foreach ($array as $value) &#123;        $items[$value[&#39;id&#39;]] = $value;    &#125;    //第二步 遍历数据 生成树状结构    $tree = array();    foreach ($items as $key =&gt; $item) &#123;        if (isset($items[$item[&#39;pid&#39;]])) &#123;            $items[$item[&#39;pid&#39;]][&#39;son&#39;][] = &amp;$items[$key];        &#125; else &#123;            $tree[] = &amp;$items[$key];        &#125;    &#125;    return $tree;&#125;$array = [    [        &#39;id&#39; =&gt; 1,        &#39;pid&#39; =&gt; 0,    ],    [        &#39;id&#39; =&gt; 2,        &#39;pid&#39; =&gt; 1,    ],    [        &#39;id&#39; =&gt; 3,        &#39;pid&#39; =&gt; 2,    ],    [        &#39;id&#39; =&gt; 4,        &#39;pid&#39; =&gt; 3,    ],    [        &#39;id&#39; =&gt; 5,        &#39;pid&#39; =&gt; 4,    ],    [        &#39;id&#39; =&gt; 6,        &#39;pid&#39; =&gt; 5,    ],    [        &#39;id&#39; =&gt; 7,        &#39;pid&#39; =&gt; 6,    ],    [        &#39;id&#39; =&gt; 8,        &#39;pid&#39; =&gt; 7,    ],    [        &#39;id&#39; =&gt; 9,        &#39;pid&#39; =&gt; 8,    ],    [        &#39;id&#39; =&gt; 10,        &#39;pid&#39; =&gt; 9,    ],];$getTree = generateTree($array);print_r($getTree);</code></pre>]]>
    </content>
    <id>https://hcr707305003.github.io/2020/04/17/22-%E7%AE%80%E5%8D%95%E5%AE%9E%E7%8E%B0%E6%97%A0%E9%99%90%E6%9E%81/</id>
    <link href="https://hcr707305003.github.io/2020/04/17/22-%E7%AE%80%E5%8D%95%E5%AE%9E%E7%8E%B0%E6%97%A0%E9%99%90%E6%9E%81/"/>
    <published>2020-04-17T03:00:44.000Z</published>
    <summary>
      <![CDATA[<pre><code>&lt;?php
function generateTree($array)
&#123;
    //第一步 构造数据
    $items = array();
    foreach ($array as $value) &#123;]]>
    </summary>
    <title>22.简单实现无限极</title>
    <updated>2022-01-20T08:21:33.703Z</updated>
  </entry>
  <entry>
    <author>
      <name>Shiroi</name>
    </author>
    <category term="工作心德" scheme="https://hcr707305003.github.io/categories/%E5%B7%A5%E4%BD%9C%E5%BF%83%E5%BE%B7/"/>
    <category term="php" scheme="https://hcr707305003.github.io/tags/php/"/>
    <category term="设计模式" scheme="https://hcr707305003.github.io/tags/%E8%AE%BE%E8%AE%A1%E6%A8%A1%E5%BC%8F/"/>
    <content>
      <![CDATA[<ol><li>一个主体有多个结构(例如小白(一个人)：会说多少种语言、肤色、发色、家境、家里多少口人、性格、有木有配偶等等)</li><li>我们就要针对这个人返回这个人的所有结构</li><li>这个人每个结构处理方式不同</li><li>那么我们就要决定这个人究竟是什么人</li></ol><hr><p><strong>这里就以卢本伟为案例</strong></p><pre><code>/**具体产品角色  人 * Class Bird */class Person&#123;    public $_language;    public $_skin;    public $_hair;    public $_family;    public $_population;    public $_nature;    public $_marriage;     function show()    &#123;        echo &quot;会的语言:&#123;$this-&gt;_language&#125;&lt;br/&gt;&quot;;        echo &quot;肤色:&#123;$this-&gt;_skin&#125;&lt;br/&gt;&quot;;        echo &quot;发色:&#123;$this-&gt;_hair&#125;&lt;br/&gt;&quot;;        echo &quot;家境:&#123;$this-&gt;_family&#125;&lt;br/&gt;&quot;;        echo &quot;人口:&#123;$this-&gt;_population&#125;&lt;br/&gt;&quot;;        echo &quot;性格:&#123;$this-&gt;_nature&#125;&lt;br/&gt;&quot;;        echo &quot;婚姻关系:&#123;$this-&gt;_marriage&#125;&lt;br/&gt;&quot;;    &#125;&#125; /**人的建造者(生成器) * Class BirdBuilder */abstract class PersonBuilder&#123;    protected $_person;     function __construct()    &#123;        $this-&gt;_person=new Person();    &#125;     abstract function BuildLanguage();//语言    abstract function BuildSkin();//肤色    abstract function BuildHair();//发色    abstract function BuildFamily();//家境    abstract function BuildPopulation();//人口    abstract function BuildNature();//性格    abstract function BuildMarriage();//婚姻关系    abstract function GetPerson();//获取人物所有信息&#125; /**具体人的建造者(生成器)   卢本伟(55开) * Class BlueBird */class LuBenWei extends PersonBuilder&#123;    function BuildLanguage()    &#123;        $this-&gt;_person-&gt;_language=&quot;会骚话、臭嗨话&quot;;    &#125;     function BuildSkin()    &#123;        $this-&gt;_person-&gt;_skin=&quot;卢本伟什么肤色都有&quot;;    &#125;     function BuildHair()    &#123;        $this-&gt;_person-&gt;_hair=&quot;卢本伟是个光头&quot;;    &#125;        function BuildFamily()    &#123;        $this-&gt;_person-&gt;_family=&quot;卢本伟富得流油&quot;;    &#125;        function BuildPopulation()    &#123;        $this-&gt;_person-&gt;_population=&quot;卢本伟是个孤儿&quot;;    &#125;        function BuildNature()    &#123;        $this-&gt;_person-&gt;_nature=&quot;卢本伟帅的一批、卢本伟不跟你多BB&quot;;    &#125;        function BuildMarriage()    &#123;        $this-&gt;_person-&gt;_marriage=&quot;卢本伟有个白富美老婆&quot;;    &#125;     function GetPerson()    &#123;        return $this-&gt;_person;    &#125;&#125;  /**指挥者 * Class Director */class Director&#123;    /**     * @param $_builder      建造者     * @return mixed         产品类：人     */    function Construct($_builder)    &#123;        $_builder-&gt;BuildLanguage();        $_builder-&gt;BuildSkin();        $_builder-&gt;BuildHair();        $_builder-&gt;BuildFamily();        $_builder-&gt;BuildPopulation();        $_builder-&gt;BuildNature();        $_builder-&gt;BuildMarriage();        return $_builder-&gt;GetPerson();    &#125;&#125;$director=new Director();echo &quot;卢本伟的人物信息：&lt;hr/&gt;&quot;;$lubenwei=$director-&gt;Construct(new LuBenWei());$lubenwei-&gt;show();</code></pre><hr><pre><code>//执行的结果卢本伟的人物信息：会的语言:会骚话、臭嗨话肤色:卢本伟什么肤色都有发色:卢本伟是个光头家境:卢本伟富得流油人口:卢本伟是个孤儿性格:卢本伟帅的一批、卢本伟不跟你多BB婚姻关系:卢本伟有个白富美老婆</code></pre>]]>
    </content>
    <id>https://hcr707305003.github.io/2019/11/18/21-PHP%E8%AE%BE%E8%AE%A1%E8%80%85%E6%A8%A1%E5%BC%8F-%E5%BB%BA%E9%80%A0%E8%80%85%E6%A8%A1%E5%BC%8F/</id>
    <link href="https://hcr707305003.github.io/2019/11/18/21-PHP%E8%AE%BE%E8%AE%A1%E8%80%85%E6%A8%A1%E5%BC%8F-%E5%BB%BA%E9%80%A0%E8%80%85%E6%A8%A1%E5%BC%8F/"/>
    <published>2019-11-17T20:44:19.000Z</published>
    <summary>
      <![CDATA[<ol>
<li>一个主体有多个结构(例如小白(一个人)：会说多少种语言、肤色、发色、家境、家里多少口人、性格、有木有配偶等等)</li>
<li>我们就要针对这个人返回这个人的所有结构</li>
<li>这个人每个结构处理方式不同</li>
<li>那么我们就要决定这个人究竟是]]>
    </summary>
    <title>
      <![CDATA[21.PHP设计者模式->建造者模式]]>
    </title>
    <updated>2022-01-20T08:21:17.114Z</updated>
  </entry>
  <entry>
    <author>
      <name>Shiroi</name>
    </author>
    <category term="工作心德" scheme="https://hcr707305003.github.io/categories/%E5%B7%A5%E4%BD%9C%E5%BF%83%E5%BE%B7/"/>
    <category term="php" scheme="https://hcr707305003.github.io/tags/php/"/>
    <category term="设计模式" scheme="https://hcr707305003.github.io/tags/%E8%AE%BE%E8%AE%A1%E6%A8%A1%E5%BC%8F/"/>
    <content>
      <![CDATA[<ol><li>观测者模式属于一对多依赖关系</li><li>当一个对象发生改变时，他所依赖的的对象都得到通知</li><li>可以在独立的对象（主体）中维护一个对主体感兴趣的依赖项（观察器）列表</li><li>所有的依赖项（观察器）各自实现公共的ObjectServer接口，取消主体和依赖对象之间的依赖关系</li></ol><hr><p><strong>观察者模式应用的场景</strong></p><ol><li>购买商品送优惠券、送商品、送积分、送称号、日志记录</li><li>购火车票要短信通知、日志记录、优惠券赠送</li></ol><p><strong>以下就以购买火车票场景编写业务</strong></p><pre><code>&lt;?php/** * 观察者模式应用场景实例 * * 免责声明:本文只是以哈票网举例，示例中并未涉及哈票网任何业务代码，全部原创，如有雷同，纯属巧合。 * * 场景描述： * 哈票以购票为核心业务(此模式不限于该业务)，但围绕购票会产生不同的其他逻辑，如： * 1、购票后记录文本日志 * 2、购票后记录数据库日志 * 3、购票后发送短信 * 4、购票送抵扣卷、兑换卷、积分 * 5、其他各类活动等 * * 传统解决方案: * 在购票逻辑等类内部增加相关代码，完成各种逻辑。 * * 存在问题： * 1、一旦某个业务逻辑发生改变，如购票业务中增加其他业务逻辑，需要修改购票核心文件、甚至购票流程。 * 2、日积月累后，文件冗长，导致后续维护困难。 * * 存在问题原因主要是程序的&quot;紧密耦合&quot;，使用观察模式将目前的业务逻辑优化成&quot;松耦合&quot;，达到易维护、易修改的目的， * 同时也符合面向接口编程的思想。 * * 观察者模式典型实现方式： * 1、定义2个接口：观察者（通知）接口、被观察者（主题）接口 * 2、定义2个类，观察者对象实现观察者接口、主题类实现被观者接口 * 3、主题类注册自己需要通知的观察者 * 4、主题类某个业务逻辑发生时通知观察者对象，每个观察者执行自己的业务逻辑。 * * 示例：如以下代码 * */ date_default_timezone_set(&#39;PRC&#39;); //设置中国时区#===================定义观察者、被观察者接口============/** * 观察者接口(通知接口) */interface ITicketObserver //观察者接口&#123;  function onBuyTicketOver($sender, $args); //得到通知后调用的方法&#125;/** * 主题接口 */interface ITicketObservable //被观察对象接口&#123;  function addObserver($observer); //提供注册观察者方法&#125;/** * * 主题类（购票） * */class HipiaoBuy implements ITicketObservable &#123; //实现主题接口（被观察者）    private $_observers = array (); //通知数组（观察者）    public function buyTicket($ticket) //购票核心类，处理购票流程      &#123;      // TODO 购票逻辑      //循环通知，调用其onBuyTicketOver实现不同业务逻辑        foreach ( $this-&gt;_observers as $obs )            $obs-&gt;onBuyTicketOver ( $this, $ticket ); //$this 可用来获取主题类句柄，在通知中使用    &#125;    //添加通知    public function addObserver($observer) //添加N个通知      &#123;        $this-&gt;_observers [] = $observer;    &#125;&#125;#=========================定义多个通知====================//短信日志通知class HipiaoMSM implements ITicketObserver &#123;    public function onBuyTicketOver($sender, $ticket) &#123;        echo (date ( &#39;Y-m-d H:i:s&#39; ) . &quot; 短信日志记录：购票成功:$ticket&lt;br&gt;&quot;);    &#125;&#125;//文本日志通知class HipiaoTxt implements ITicketObserver &#123;    public function onBuyTicketOver($sender, $ticket) &#123;        echo (date ( &#39;Y-m-d H:i:s&#39; ) . &quot; 文本日志记录：购票成功:$ticket&lt;br&gt;&quot;);    &#125;&#125;  //抵扣卷赠送通知class HipiaoDiKou implements ITicketObserver &#123;    public function onBuyTicketOver($sender, $ticket) &#123;        echo (date ( &#39;Y-m-d H:i:s&#39; ) . &quot; 赠送抵扣卷：购票成功:$ticket 赠送10元抵扣卷1张。&lt;br&gt;&quot;);    &#125;&#125;#============================用户购票====================$buy = new HipiaoBuy ();$buy-&gt;addObserver ( new HipiaoMSM () ); //根据不同业务逻辑加入各种通知$buy-&gt;addObserver ( new HipiaoTxt () );$buy-&gt;addObserver ( new HipiaoDiKou () );//购票$buy-&gt;buyTicket ( &quot;一排一号&quot; );</code></pre>]]>
    </content>
    <id>https://hcr707305003.github.io/2019/11/18/20-PHP%E8%AE%BE%E8%AE%A1%E6%A8%A1%E5%BC%8F-%E8%A7%82%E5%AF%9F%E8%80%85%E6%A8%A1%E5%BC%8F/</id>
    <link href="https://hcr707305003.github.io/2019/11/18/20-PHP%E8%AE%BE%E8%AE%A1%E6%A8%A1%E5%BC%8F-%E8%A7%82%E5%AF%9F%E8%80%85%E6%A8%A1%E5%BC%8F/"/>
    <published>2019-11-17T19:47:49.000Z</published>
    <summary>
      <![CDATA[<ol>
<li>观测者模式属于一对多依赖关系</li>
<li>当一个对象发生改变时，他所依赖的的对象都得到通知</li>
<li>可以在独立的对象（主体）中维护一个对主体感兴趣的依赖项（观察器）列表</li>
<li>所有的依赖项（观察器）各自实现公共的ObjectServe]]>
    </summary>
    <title>
      <![CDATA[20.PHP设计模式->观察者模式]]>
    </title>
    <updated>2022-01-20T08:21:10.459Z</updated>
  </entry>
  <entry>
    <author>
      <name>Shiroi</name>
    </author>
    <category term="工作心德" scheme="https://hcr707305003.github.io/categories/%E5%B7%A5%E4%BD%9C%E5%BF%83%E5%BE%B7/"/>
    <category term="php" scheme="https://hcr707305003.github.io/tags/php/"/>
    <category term="trait" scheme="https://hcr707305003.github.io/tags/trait/"/>
    <content>
      <![CDATA[<p><strong>这里定义图片的增删改查trait类</strong></p><pre><code>trait HandlePicture&#123;    protected static $path = &quot;C:/www&quot;;    private static function add(): string//增    &#123;        return self::$add;    &#125;    public static function delete(): string//删    &#123;        return self::$delete;    &#125;    public static function update(): string//改    &#123;        return self::$update;    &#125;    public static function get(): string//查    &#123;        return self::$get;    &#125;&#125;</code></pre><p><strong>引入图片的trait类</strong></p><pre><code>class DB&#123;    use HandlePicture;    public static $add = &#39;add&#39;;    public static $delete = &#39;delete&#39;;    public static $update = &#39;update&#39;;    public static $get = &#39;get&#39;;    public function __construct()&#123;&#125;    public function __clone()&#123;&#125;        public function addPicture()    &#123;        echo self::add();    &#125;&#125;$addPicture = new DB();//实例化DB类$addPicture-&gt;addPicture();//调用函数</code></pre>]]>
    </content>
    <id>https://hcr707305003.github.io/2019/11/18/19-PHP%E8%B0%83%E7%94%A8trait%E7%B1%BB/</id>
    <link href="https://hcr707305003.github.io/2019/11/18/19-PHP%E8%B0%83%E7%94%A8trait%E7%B1%BB/"/>
    <published>2019-11-17T17:12:21.000Z</published>
    <summary>
      <![CDATA[<p><strong>这里定义图片的增删改查trait类</strong></p>
<pre><code>trait HandlePicture
&#123;
    protected static $path = &quot;C:/www&quot;;

    privat]]>
    </summary>
    <title>19.PHP调用trait类</title>
    <updated>2022-01-20T08:21:03.122Z</updated>
  </entry>
</feed>